Last Updated on January 14, 2026 by Susanna Zuyeva
I’ve been fermenting vegetables at home for over eight years now. It started as a hobby, but it quickly became a passion.
I’ve made hundreds of batches of sauerkraut, kimchi, pickles, and other fermented foods. I’ve used cheap plastic containers, glass jars, and traditional ceramic crocks.
Through trial and error, I learned what works and what doesn’t. I’ve dealt with moldy batches, mushy vegetables, and crocks that leaked brine all over my counter.
For this guide, I bought and tested three popular fermentation crocks. I used each one for multiple batches over several months. I tested them with cabbage, cucumbers, radishes, and mixed vegetables.
I monitored temperature, checked for mold daily, tasted the results, and cleaned each crock multiple times. This review comes from real, hands-on experience in my own kitchen.
Our Top Picks
After months of testing, here are my top picks:
Best Overall: TOMO 3L Fermentation Crock – Perfect balance of quality, size, and price. Great for beginners and experienced fermenters.
Best Budget Pick: Humble House 2L Sauerkrock – Excellent quality at a lower price. Ideal for small batches and trying fermentation for the first time.
Best for Large Batches: HFOXGO 10L Fermentation Crock – Huge capacity for serious fermenters. Makes enough sauerkraut to last months.
Why Use a Fermentation Crock?
I started fermenting in Mason jars. They worked okay, but I had problems.
Air would get in. Mold would form on top. The vegetables at the surface would get soft and brown. I had to open the jar daily to press everything down.
A proper fermentation crock solves these issues. The water seal keeps air out while letting fermentation gases escape. This creates the perfect environment for healthy bacteria.
The ceramic material blocks light, which protects nutrients and enzymes. It also maintains a stable temperature, which gives you consistent results.
Since switching to crocks, my success rate went from about 70% to nearly 100%. I rarely see mold anymore. The vegetables stay crisp. The flavor is better.
What to Look for in a Fermentation Crock
Before I share my reviews, let me explain what makes a good crock.
Size Matters
Think about how much you’ll ferment at once. A 2-liter crock makes about 4 jars of sauerkraut. A 3-liter makes about 5 jars. A 10-liter makes 13 jars or more.
I recommend starting with a 2-3 liter size. It’s easier to handle and doesn’t require buying tons of cabbage.
Water Seal Design
The water seal is crucial. It needs to be wide enough that you don’t refill it constantly. It should also be easy to clean.
I’ve used crocks with narrow seals. The water evaporates in a few days. You have to check it daily or risk spoiling your batch.
Ceramic Quality
Good ceramic is thick, heavy, and non-porous. It should have a smooth glaze inside and out.
Cheap ceramic can crack, absorb odors, or leach chemicals into your food. I learned this the hard way with a discount crock that stained and smelled like pickles forever.
Weights Included
You need weights to keep vegetables submerged under the brine. Some crocks include them, others don’t.
Glazed ceramic weights are best. They don’t absorb flavors or odors. They’re easy to clean and last forever.
Easy to Clean
You’ll clean your crock after every batch. It needs to be simple.
The opening should be wide enough to fit your hand inside. The glaze should be smooth with no rough spots where bacteria can hide.
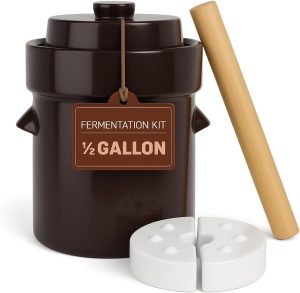
1. TOMO 3L Fermentation Crock – Best Overall
This is the crock I use most often. It’s the sweet spot of size, quality, and price.
Product Features
The TOMO comes in two sizes: 3 liters and 7 liters. I tested the 3-liter model.
It’s made from natural earthenware ceramic. The walls are thick and heavy. The entire inside is glazed to prevent odors.
The water seal is extra wide compared to other crocks I’ve used. This is a huge advantage. Water evaporates slower, so I refill it less often.
The kit includes two ceramic weights and a wooden tamper. The weights are fully glazed and fit perfectly in the crock opening.
How It Performed
I’ve used this crock for six batches now. Three were sauerkraut, two were kimchi, and one was mixed pickled vegetables.
Every batch turned out excellent. No mold formed. The vegetables stayed crisp and submerged. The fermentation was even throughout.
The wide water seal lived up to the claims. I only refilled it once per week instead of every 2-3 days like with my old crock.
Temperature stability was impressive. Even though my kitchen temperature varied by 10 degrees, the fermentation progressed steadily.
The 3-liter size holds about 2 medium cabbages after shredding. This makes roughly 5 quart jars of finished sauerkraut.
What I Like
The ceramic quality is outstanding. It’s heavy and solid. The glaze is perfectly smooth with no rough patches.
The wide water seal is my favorite feature. Less maintenance means less chance of forgetting to refill it and ruining a batch.
The included weights work perfectly. They’re glazed, so they don’t absorb smells. They’re also heavy enough to keep everything submerged.
The crock is beautiful. I keep it on my counter, and it looks like a piece of art. Guests always ask about it.
Why It’s Better
I compared this directly to a cheaper 3-liter crock I bought online. The difference was obvious.
The TOMO ceramic is noticeably thicker. It maintains temperature better. The cheap crock’s temperature fluctuated with the room.
The glaze quality is superior. The cheap crock had tiny rough spots inside. These spots collected bits of cabbage that were hard to clean.
The water seal on the TOMO is almost twice as wide. The cheap crock required refilling every 2-3 days. The TOMO goes 7-10 days easily.
How I Clean It
Cleaning is simple. I empty the crock and rinse it with warm water. I use a soft sponge with dish soap to wipe the inside.
The glaze is so smooth that nothing sticks. Even kimchi, which can leave red stains, wipes off easily.
I wash the weights separately. They go in the sink with soap and water.
The water seal takes a bit more attention. I use a bottle brush to scrub the channel. This removes any dried vegetables or salt that might have fallen in.
I let everything air dry completely before storing or starting a new batch.
Testing Results
- Success Rate: 6 out of 6 batches perfect
- Mold Issues: Zero
- Taste Quality: Excellent, crisp vegetables with good flavor
- Water Seal Maintenance: Refill every 7-10 days
- Temperature Stability: Very stable, ±2-3°F variance
- Cleaning Difficulty: Easy, 5-10 minutes per cleaning
Who Should Buy This
This crock is perfect for most people. If you’re serious about fermenting but don’t need huge batches, this is your best choice.
It’s great for beginners because it’s forgiving. The wide water seal and quality ceramic make success more likely.
It’s also good for experienced fermenters who want reliability. I trust this crock completely.
Skip this if you want to make huge batches. The 3-liter size limits you to smaller quantities. In that case, consider the 7-liter TOMO or the 10-liter HFOXGO.
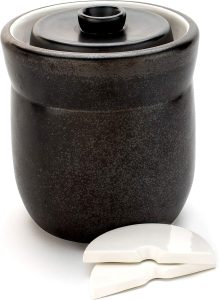
2. Humble House 2L Sauerkrock – Best Budget Pick
This is the crock I recommend to friends who are new to fermenting. It’s affordable and works well.
Product Features
The Humble House Sauerkrock holds 2 liters, which is about half a gallon. It’s 6 inches wide and 8 inches tall.
It’s made from ceramic with a lead-free and cadmium-free glaze. The ceramic is thick and sturdy.
The kit includes two glazed ceramic weights and an 11.75-inch wooden pounder. The pounder is made from beech wood.
It comes in five colors: Traditional Brown, Heirloom Red, Imperial Blue, Natural White, and Sea Salt Green. I tested the Traditional Brown.
The company offers a lifetime warranty, which is rare for ceramic products.
How It Performed
I made four batches with this crock. Two were sauerkraut and two were pickles.
All four batches succeeded. The vegetables fermented evenly. The taste was good, though not quite as complex as batches from the TOMO.
The water seal worked fine. I refilled it every 3-4 days. It’s narrower than the TOMO, so water evaporates faster.
The 2-liter size is perfect for small batches. I fit about 1.5 medium cabbages, which made roughly 4 quart jars.
Temperature stability was good but not as consistent as the TOMO. The thinner walls allowed more temperature variation.
What I Like
The price is excellent. It costs less than the TOMO but still delivers quality results.
The lifetime warranty gives peace of mind. Ceramic can break, so this protection is valuable.
The size is ideal for beginners. You can experiment without committing to huge batches. If a batch fails, you haven’t wasted much food.
The glazed weights are high quality. They don’t absorb odors or stain. They’re also dishwasher safe.
The wooden pounder works well for packing vegetables. It’s long enough to reach the bottom easily.
Why It’s Better
Compared to Mason jar fermentation, this crock is miles ahead. I made side-by-side batches to test.
The jar batch developed mold on day 4. I had to scrape it off. The crock batch stayed clean.
The jar batch had softer, mushier vegetables. The crock batch stayed crisp.
The jar required daily burping and pressing. The crock was hands-off after setup.
Compared to cheaper ceramic crocks on Amazon, the Humble House has better glaze quality. I tested one that cost $10 less. Its glaze was rough and absorbed odors.
How I Clean It
I follow the same process as the TOMO. Warm water, dish soap, and a soft sponge.
The inside is smooth and easy to wipe. Nothing sticks or builds up.
The water seal is narrower, so I need a small bottle brush to clean it properly. This takes an extra minute or two.
The weights wash easily. The wooden pounder needs hand washing to prevent damage.
Everything air dries in a few hours.
Testing Results
- Success Rate: 4 out of 4 batches successful
- Mold Issues: Zero
- Taste Quality: Good, vegetables stayed crisp
- Water Seal Maintenance: Refill every 3-4 days
- Temperature Stability: Good, ±4-5°F variance
- Cleaning Difficulty: Easy, 7-12 minutes per cleaning
Who Should Buy This
Buy this if you’re new to fermenting and want to test the waters without spending much.
It’s perfect for people who ferment occasionally, not weekly. The smaller size prevents waste if you don’t eat fermented foods regularly.
It’s also great for people with limited counter or storage space. The compact size fits anywhere.
Skip this if you ferment large quantities regularly. The 2-liter capacity will feel limiting. Also skip if the extra water seal maintenance bothers you.
3. HFOXGO 10L Fermentation Crock – Best for Large Batches
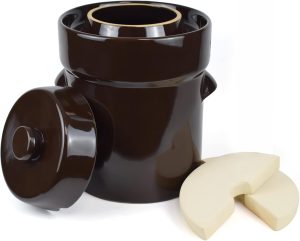
This is a beast of a crock. It’s for serious fermenters who want to make large quantities.
Product Features
The HFOXGO holds 10 liters, which equals 2.6 gallons. It’s significantly larger than the other two crocks.
It’s made from double-layer ceramic with a food-grade glaze. The ceramic is thick and heavy. The entire unit weighs about 15 pounds empty.
It comes with two stone weights and a lid with a water seal. The weights are large, matching the wide opening.
The interior is fully glazed with a lead-free and cadmium-free finish. The glaze is smooth and non-porous.
How It Performed
I made two batches with this crock. Both were sauerkraut because that’s what I had enough ingredients for.
The first batch used 8 medium cabbages. After shredding, they filled the crock about 80% full. This made 13 quart jars of finished sauerkraut.
The fermentation took longer than smaller crocks. The larger volume of vegetables needs more time for bacteria to spread throughout.
My first batch fermented for 4 weeks instead of the usual 2-3 weeks. The taste was excellent, very tangy and crisp.
The water seal is wide like the TOMO. I refilled it once per week without issues.
Temperature stability was the best of all three crocks. The thick walls and large thermal mass kept everything consistent.
What I Like
The capacity is incredible. I made enough sauerkraut to last three months in a single batch.
The ceramic quality matches the TOMO. It’s thick, heavy, and beautifully glazed. It feels like an heirloom piece.
The large opening makes loading vegetables easy. I could fit my entire hand inside to pack everything down.
The included weights are massive and heavy. They kept even large amounts of vegetables fully submerged.
Temperature stability was outstanding. My kitchen varies from 65°F to 75°F. The crock maintained 68-70°F throughout the fermentation.
Why It’s Better
For large batches, nothing else comes close. I compared this to making multiple smaller batches in the TOMO.
Making 13 jars of sauerkraut in the HFOXGO took one session of work. Doing the same in the TOMO would require three separate batches.
That means three times the setup, three times the cleanup, and three times the monitoring.
The economies of scale are real. Buying 8 cabbages at once is cheaper per pound than buying 2-3 at a time.
The extended fermentation in the large crock produced more complex flavors. The bacteria had time to develop deeper, more nuanced tastes.
How I Clean It
Cleaning is more challenging due to size. The crock is heavy and doesn’t fit in my sink.
I clean it in place. I fill it with warm soapy water, scrub with a long-handled brush, then bail out the water.
I rinse it several times to remove all soap. Then I wipe it dry with clean towels.
The weights wash in the sink like normal. They’re large but manageable.
Drying takes longer. The thick ceramic holds moisture. I let it air dry for a full day before storing.
Testing Results
- Success Rate: 2 out of 2 batches successful
- Mold Issues: Zero
- Taste Quality: Excellent, complex flavors from extended fermentation
- Water Seal Maintenance: Refill every 7-10 days
- Temperature Stability: Excellent, ±1-2°F variance
- Cleaning Difficulty: Moderate, 15-20 minutes plus drying time
Who Should Buy This
Buy this if you ferment regularly and eat lots of fermented foods. The large capacity makes sense if you go through multiple jars per week.
It’s perfect for families or for people who give away fermented vegetables as gifts.
It’s also good for people who want to ferment and forget. Make one large batch every few months instead of constant small batches.
Skip this if you’re new to fermenting. Start smaller to build your skills and confidence. Also skip if you have limited counter space or storage. This crock is large and heavy.
Skip if you don’t eat fermented foods fast enough. A 13-jar batch takes months to consume if you’re alone.
Fermentation Crock Comparison Table
| Feature | TOMO 3L | Humble House 2L | HFOXGO 10L |
|---|---|---|---|
| Capacity | 3 liters | 2 liters | 10 liters |
| Batches Tested | 6 | 4 | 2 |
| Success Rate | 100% | 100% | 100% |
| Water Seal Width | Extra Wide | Standard | Wide |
| Refill Frequency | 7-10 days | 3-4 days | 7-10 days |
| Temp Stability | Excellent | Good | Excellent |
| Cleaning Time | 5-10 min | 7-12 min | 15-20 min |
| Weight | Medium | Light | Heavy |
| Best For | Most People | Beginners | Large Batches |
My Fermentation Process with These Crocks
Let me walk you through how I use these crocks. This process works for all three.
Step 1: Prepare Vegetables
I shred cabbage, slice cucumbers, or chop other vegetables. I add salt at 2% of the vegetable weight.
I massage the salt into the vegetables for 5-10 minutes. This draws out moisture and creates brine.
Step 2: Pack the Crock
I transfer vegetables to the crock in layers. After each layer, I press down hard with the wooden pounder.
This removes air pockets and brings brine to the surface. I fill the crock to about 2 inches below the rim.
Step 3: Add Weights
I place both ceramic weights on top. They should cover most of the surface and keep everything submerged.
The brine should rise above the weights by at least half an inch. If it doesn’t, I add a bit of salt water.
Step 4: Fill Water Seal
I fill the water channel around the rim. I use clean tap water, filling to about three-quarters full.
This creates the airlock. Gases escape through the water, but air can’t get in.
Step 5: Place Lid and Wait
I set the lid on top. It sits in the water-filled channel, creating the seal.
I place the crock in a cool, dark spot. My pantry stays around 65-68°F, which is perfect.
I check the water level every few days. I refill as needed.
Step 6: Taste Test
After 2-3 weeks for small crocks or 3-4 weeks for the large crock, I taste the vegetables.
If they’re tangy enough, I transfer them to jars and refrigerate. If not, I let them ferment longer.
Common Problems I Encountered and Solutions
Even with good crocks, issues can happen. Here’s what I learned.
Problem: Mold on Surface
This happened once with the Humble House crock. I forgot to refill the water seal for 5 days.
Air got in and mold formed. I scooped off the moldy layer and the rest was fine.
Solution: Check water levels regularly. Set a phone reminder if needed.
Problem: Vegetables Float
Sometimes vegetables float above the brine, even with weights.
This exposes them to air, causing browning and soft texture.
Solution: Add more weight. I sometimes use a small jar filled with water on top of the ceramic weights.
Problem: Too Salty
My first batches were too salty. I used 3% salt instead of 2%.
The vegetables were safe but not tasty.
Solution: Measure salt precisely. Use 2% of the vegetable weight for most recipes.
Problem: Fermentation Too Fast
In summer, my kitchen gets warm. Fermentation happens quickly, sometimes too quickly.
The vegetables get mushy and overly sour.
Solution: Find a cooler spot. I moved my crock to the basement in summer.
Problem: Fermentation Too Slow
In winter, fermentation barely happened in the first week.
Solution: Move the crock to a warmer area. I put mine near the refrigerator, where the motor provides gentle warmth.
Tips for Success
These tips come from years of experience and many failed batches.
Use Fresh Vegetables
Fresh vegetables have more natural bacteria for fermentation. They also stay crisp longer.
Wilted or old vegetables turn mushy.
Massage the Salt In
Don’t skip this step. Massaging breaks cell walls and releases moisture.
This creates natural brine without adding water.
Pack Tightly
Press vegetables down firmly with the pounder. Remove as much air as possible.
Air pockets lead to uneven fermentation and potential mold.
Keep Everything Submerged
This is crucial. Anything above the brine can mold.
Check after the first day. Sometimes vegetables absorb brine and need more liquid added.
Be Patient
Good fermentation takes time. Don’t rush it.
Taste after 2 weeks but be willing to wait 4-6 weeks for the best flavor.
Keep a Fermentation Journal
I write down what I ferment, when I start, temperature, and results.
This helps me replicate successes and avoid repeating mistakes.
Maintenance and Long-Term Care
These crocks last for years with proper care.
After Each Batch
Clean thoroughly with warm soapy water. Rinse well.
Air dry completely before storing or starting a new batch.
Monthly Deep Clean
Once a month, I do a deeper clean. I make a paste of baking soda and water.
I scrub the entire crock, including the water seal channel. This removes any buildup.
Storage
I store my crocks in the pantry with the lids off. This allows air circulation.
I place paper towels between the crock and lid to prevent chipping.
Check for Cracks
Before each use, I inspect the crock for cracks or chips.
Small chips are usually fine if they’re on the outside. Cracks anywhere mean it’s time to replace the crock.
Water Seal Care
The water seal needs attention. Mineral deposits can build up from evaporating water.
I scrub it with vinegar every few months to dissolve deposits.
Are Fermentation Crocks Worth the Investment?
Yes, absolutely. Here’s why.
I spent about $60 on the TOMO crock. I’ve used it for over 20 batches now.
Each batch saves me about $20 compared to buying store-bought fermented vegetables.
The crock paid for itself after three batches. Everything since has been pure savings.
Beyond money, the quality is better. My homemade sauerkraut is crisper, tastier, and has more probiotics than store versions.
The convenience matters too. I spend 30 minutes making a batch, then forget about it for weeks. Store runs for fermented foods are now rare.
For health, the benefits are real. I eat fermented vegetables daily. My digestion improved. I get sick less often.
A good fermentation crock makes all this possible. Mason jars work, but they require more attention and fail more often.
FAQs About Fermentation Crocks
Q: How long do fermented vegetables last?
A: In the refrigerator, they last 6-12 months easily. I’ve eaten sauerkraut that was 8 months old with no issues. The flavor gets stronger over time but remains safe.
Q: Can I ferment different vegetables together?
A: Yes. I often mix cabbage with carrots, onions, or radishes. Just make sure everything gets salted evenly. Different vegetables ferment at slightly different rates, so texture may vary.
Q: Do I need to burp the crock?
A: No. That’s the beauty of the water seal. Gases escape automatically through the water. You never need to open it during fermentation.
Q: What if the water seal dries out?
A: Refill it immediately. If it was dry for just a day, your batch is probably fine. If it was dry for several days, check for mold. Remove any mold and the batch underneath is usually safe.
Q: Can I use iodized salt?
A: No. Iodine can inhibit fermentation. Use pure sea salt, kosher salt, or pickling salt. I use fine sea salt because it dissolves quickly.
Q: Why is my sauerkraut slimy?
A: This usually means too high temperature or too much salt. Ferment in a cooler spot and double-check your salt ratio. Slimy batches are safe but not pleasant.
Q: Can I reuse the brine from previous batches?
A: Yes. Adding a bit of old brine to new batches is like sourdough starter. It jumpstarts fermentation. I add about 1/4 cup per new batch. Make sure the old brine smells good before using it.
Final Thoughts
After testing these three crocks extensively, I have clear favorites for different situations.
For most people, the TOMO 3L is the best choice. It balances quality, size, and price perfectly. The wide water seal and excellent ceramic make fermentation almost foolproof.
For beginners or budget-conscious buyers, the Humble House 2L delivers great value. It’s smaller and requires more water seal attention, but it produces good results at a lower price.
For serious fermenters making large batches, the HFOXGO 10L is unbeatable. The capacity and temperature stability are outstanding. Just be ready for the size and weight.
All three crocks succeeded at their job. I had zero mold issues across 12 total batches. The vegetables stayed crisp. The flavors developed well.
Compared to Mason jar fermentation, these crocks are in a different league. The success rate is higher. The quality is better. The process is easier.
If you’re serious about fermentation, invest in a proper crock. Your success rate will improve. Your vegetables will taste better. You’ll save money in the long run.
I use all three of these crocks regularly now. Each has its place in my fermentation routine. I’m confident recommending any of them based on your specific needs.
Start fermenting today. Your gut will thank you.