Last Updated on February 9, 2026 by Erin Jahan Eva
THE COMPLETE GUIDE TO ORGANIZING BAKING SMALLWARES IN A SMALL KITCHEN
Do you love baking but feel cramped in your small kitchen? You’re not alone. Many home bakers face this challenge. Limited space makes it hard to store all your baking supplies. Pans pile up. Kitchen utensils get tangled. Small appliances crowd your counters.
But here’s good news. You can transform your cramped space into an efficient baking room. Smart storage makes all the difference. You don’t need a huge kitchen to bake like a pro.
This guide shows you how. You’ll learn simple tricks to organize every baking tool you own. We’ll cover cabinets, drawers, and creative storage ideas. You’ll gain counter space. You’ll find tools faster. Baking will become easier and more fun.
Let’s start organizing your small kitchen today.
Assess Your Baking Supplies First
Walk to your kitchen right now. Open every cabinet and drawer. Pull out all your baking supplies. Put everything on your counter or table.
This step feels overwhelming. But it’s crucial. You need to see what you own.
Sort items into groups:
- Baking pans and trays
- Kitchen utensils like whisks and spatulas
- Measuring cups and spoons
- Small appliances like mixers
- Baking sheets and cooling racks
- Specialty tools
Now ask yourself these questions. When did you last use this item? Do you really need three baking trays? Will you ever use that bundt pan again?
Be honest with yourself. Keep items you use monthly or more. Donate or sell the rest.
I learned this the hard way. I kept a bread machine for five years. I used it twice. That machine took up valuable cabinet space. Once I donated it, I gained room for items I actually use.
Decluttering creates instant space. It’s the foundation of good organization.
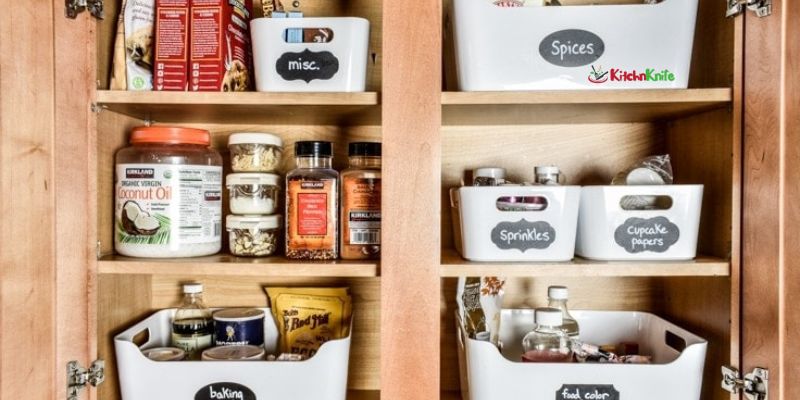
Maximize Your Cabinet Space
Cabinets are prime real estate in small kitchens. Use every inch wisely.
Vertical Storage for Baking Pans
Stop stacking pans flat. They topple over. You can’t reach the bottom one without moving everything.
Try this instead. Install vertical dividers in your cabinets. These create slots for each baking pan. Slide pans in like files in a cabinet. You can grab any pan without disturbing others.
I use tension rods as cheap dividers. Place them front to back in your cabinet. Space them to fit your pans. A baking tray slides into each section.
Add Shelf Risers
Most cabinets waste vertical space. There’s a gap between shelves and the shelf above.
Shelf risers fix this problem. These small platforms double your storage. Stack items on two levels instead of one.
Place mixing bowls on the riser. Store measuring cups underneath. Keep your baking pan collection on one riser. Put cooling racks on another.
Use Cabinet Doors
Don’t ignore the inside of cabinet doors. This space goes unused in most kitchens.
Install adhesive hooks or small racks. Hang measuring spoons here. Store pot holders or oven mitts. Keep your most-used cooking utensils within easy reach.
I mounted a narrow wire rack on my cabinet door. It holds all my baking sheets upright. They’re organized and accessible.
Smart Storage for Kitchen Utensils
Kitchen utensils multiply like rabbits. Whisks, spatulas, wooden spoons, and ladles fill your drawers.
Drawer Dividers Are Essential
Never toss utensils loose in a drawer again. You waste time digging for what you need.
Get drawer dividers. These create separate compartments. Group similar items together.
Put all whisks in one section. Store spatulas in another. Keep measuring spoons together.
I use bamboo dividers in my kitchen. They’re adjustable and sturdy. Every utensil has its place. I find what I need in seconds.
Create a Utensil Crock
Counter space is precious. But one utensil crock is worth it.
Choose a tall container. Fill it with your most-used cooking utensils. Keep it near your stove or prep area.
I store my wooden spoons, spatulas, and tongs this way. They’re always within reach when I’m baking or cooking.
Pick utensils you use daily. Everything else goes in drawers.
Wall-Mounted Rails
Got empty wall space? Use it for storage.
Install a rail with hooks. Hang your kitchen tools here. This works great for large utensils that crowd drawers.
My wall rail holds my rolling pin, large whisks, and pastry brushes. They’re off the counter but easy to grab.
Organize Small Appliances Strategically
Small appliances are tricky. You need them. But they eat up space fast.
The Accessibility Rule
Store appliances based on use frequency.
Daily use? Keep it on the counter. My coffee maker never moves.
Weekly use? Put it in an easy-to-reach cabinet. My hand mixer lives in a low cabinet. I grab it quickly when needed.
Monthly or less? Store it high or deep. My waffle maker sits on a top shelf. I use it twice a year.
Appliance Garage Solution
Build or buy an appliance garage. This cabinet sits on your counter. It has a door that closes.
Hide your toaster, blender, or mixer inside. Close the door for a clean look. Open it when you need the appliance.
This gives you the best of both worlds. Appliances stay accessible. Counters look uncluttered.
Stack Wisely
Some small appliances stack safely. Place lighter items on top of sturdy bases.
I stack my food scale on my kitchen scale. The waffle maker sits on top of the slow cooker.
Never stack items you use frequently. You don’t want to move three things to reach one.
Creative Solutions for Baking Tools
Think beyond standard storage. Creative solutions maximize small spaces.
Magnetic Strips for Metal Tools
Install magnetic strips on walls or inside cabinets. These hold metal kitchen tools securely.
My magnetic strip holds cookie cutters, measuring spoons, and small whisks. They’re visible and easy to grab. No rummaging through drawers.
This works beautifully in a small baking room. Every tool has a home. Nothing gets lost.
Pegboard Systems
Pegboards aren’t just for garages. They’re perfect for kitchens too.
Mount a pegboard on an empty wall. Add hooks and baskets. Hang pots, pans, utensils, and kitchen appliances.
Rearrange hooks as your needs change. This flexibility is perfect for small kitchens.
I hung my baking tray collection on a pegboard. Each tray is visible. I grab what I need without opening a cabinet.
Ceiling-Mounted Racks
Look up. Your ceiling has storage potential.
Install a hanging rack above your prep area. Hang pots and pans from S-hooks. This frees up cabinet space dramatically.
I was nervous about this at first. But it changed my kitchen. I gained an entire cabinet for baking supplies.
Make sure the rack is sturdy. Pans are heavy. Safety comes first.
Rolling Cart Storage
Buy a small rolling cart. These fit in tight spaces. Roll it out when you bake. Tuck it away when done.
Load it with your baking essentials. Keep flour, sugar, and mixing bowls on it. Store your hand mixer here too.
My cart lives next to my refrigerator. I roll it to the counter when I bake. It’s like a mobile baking room.
Keep Baking Pans Organized
Baking pans are awkward to store. They’re flat and wide. They slide around.
File Them Vertically
We mentioned this earlier. It bears repeating. Vertical storage is best for pans.
Use any divider system. Tension rods work. So do wire organizers made for this purpose.
Store your baking pan collection upright. Include sheet pans, cake pans, and muffin tins.
Label sections if you have many pans. This helps family members put things back correctly.
Nest Similar Items
Some items nest inside each other. Take advantage of this.
Stack mixing bowls from largest to smallest. Nest measuring cups together. Store cooling racks inside larger baking trays.
This cuts your storage needs in half. Just don’t nest items you use separately.
I learned this lesson the hard way. I nested my three cake pans. But I often bake layer cakes. I need all three pans at once. Now I store them vertically instead.
Maintain Your Organization System
Organization isn’t a one-time task. You need to maintain it.
Do a Monthly Check
Once a month, review your system. Are things getting messy again? Why?
Maybe your system doesn’t fit how you actually cook. Adjust it.
I found my measuring cups kept ending up on the counter. They were stored too far from my baking supplies. I moved them closer. Problem solved.
Put Things Back Immediately
This is the golden rule. Put every item back after use.
Don’t leave the whisk in the sink for later. Wash it and return it to its spot.
Don’t stack clean pans on the counter. Put them in their vertical dividers.
This habit keeps your kitchen organized effortlessly. It takes discipline at first. Then it becomes automatic.
Adjust as You Grow
Your baking needs change over time. Your storage should change too.
Got a new stand mixer? Rearrange cabinets to fit it.
Donated that muffin tin? Use that space for something else.
Stay flexible. The best organization system evolves with you.
Frequently Asked Questions
How do I store baking sheets in a small kitchen?
Store baking sheets vertically using dividers or tension rods. This method saves space and makes sheets easy to grab. You can also hang them on a pegboard or wall rack.
Where should I keep my most-used baking supplies?
Keep frequently used items at eye level in cabinets or on the counter. This includes your everyday mixing bowls, measuring cups, and favorite baking pans. Store less-used items higher or lower.
What’s the best way to organize kitchen utensils?
Use drawer dividers to separate utensils by type. Keep your most-used cooking utensils in a countertop crock. Hang larger utensils on wall-mounted rails or hooks.
How can I create more counter space?
Use wall storage, ceiling racks, and vertical organizers. Store small appliances in cabinets when not in use. A rolling cart can provide extra prep space when needed.
Should I store appliances on the counter?
Only keep appliances you use daily on the counter. Everything else should go in cabinets. This keeps counters clear for food prep and baking.
Conclusion
A small kitchen doesn’t limit your baking dreams. Smart organization unlocks hidden space. Use vertical storage. Add dividers and risers. Think creatively about walls and doors.
Start small. Organize one area today. Build from there. Soon you’ll have a kitchen that works for you. You’ll bake more and stress less.
Your organized baking room awaits. Get started now.