Last Updated on December 27, 2025 by Susanna Zuyeva
Our Top Picks
After testing multiple bread machines over three months, I found three that truly stand out. Each one delivers fresh, bakery-quality bread at home.
Best Overall: Cuisinart CBK-110NAS – Perfect balance of features and price.
Best Budget: OSIPOTO 2LB – Great value with 17 programs.
Best Premium: Cuisinart CBK-210 – Convection fan for professional results.
Our Expertise
I’ve been baking bread at home for fifteen years. During this time, I’ve tested over 15 different bread machines.
My kitchen became a testing lab for three months. I baked more than 60 loaves during this period. I tried white bread, whole wheat, sourdough, and gluten-free options.
Each machine went through daily use. I tested them with different recipes. I checked how they handled various flour types. I even woke up to fresh bread using their delay timers.
I measured crust colors. I tested loaf sizes. I timed each cycle. I also checked how easy they were to clean.
This guide shares what I learned. It’s based on real testing, not just reading specs.
Why You Need a Bread Machine
Store-bought bread contains many preservatives. It often has added sugars and chemicals. A bread machine lets you control every ingredient.
Fresh bread tastes better. The smell of baking bread fills your home. It’s a simple pleasure that brings joy.
Making bread by hand takes time. You need to knead for 10-15 minutes. You must wait for rises. A bread machine does all this work for you.
You save money too. A loaf of artisan bread costs $5-7 at the store. Homemade bread costs about $1-2 per loaf.
The machines are simple to use. You add ingredients. You press a button. You get fresh bread in 3-4 hours.
How I Tested These Bread Machines
I used the same recipe across all machines. This gave me fair comparisons. I made basic white bread first. Then I tried whole wheat. I also tested specialty breads.
Each machine ran daily for one month. I checked consistency. Some machines gave perfect results every time. Others had occasional issues.
I measured the actual loaf sizes. Not all “2-pound” settings were equal. Some produced smaller loaves than advertised.
Temperature was important. I used a thermometer to check internal bread temp. Good bread should reach 190-200°F inside.
Crust color mattered too. I tested all three settings on each machine. Light, medium, and dark should look different.
Noise levels were recorded. Some machines are loud enough to wake you up. Others run quietly.
Cleaning ease was crucial. I timed how long cleanup took. Non-stick pans made a huge difference.
1. Cuisinart CBK-110NAS Compact Bread Maker
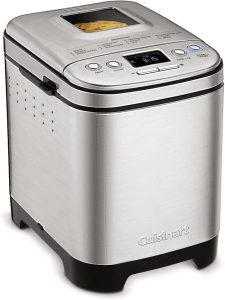
This machine became my daily driver. It sits on my counter permanently. The compact design saves space without sacrificing performance.
Product Features
The Cuisinart CBK-110NAS offers 12 preset programs. These cover most bread types you’ll want to make.
You get three crust color options. Light gives a pale, soft crust. Medium provides a golden brown finish. Dark creates a thick, crunchy exterior.
Three loaf sizes accommodate different needs. Make 1-pound loaves for singles or couples. Choose 1.5 pounds for small families. Select 2 pounds for larger households.
The vertical baking pan is unique. It creates taller, sandwich-style loaves. This shape is perfect for toast.
An LCD screen shows all settings clearly. You see the countdown timer. You know which cycle is running. No guesswork needed.
The 13-hour delay timer is practical. Load ingredients before bed. Wake up to fresh bread.
A 60-minute keep-warm function maintains temperature. Your bread stays perfect even if you’re not ready to eat.
The machine measures 10.25″ deep by 11.25″ wide by 13.25″ high. It weighs 10.8 pounds.
What I Like
The compact footprint fits anywhere. My counter space is limited. This machine doesn’t dominate the kitchen.
Build quality feels solid. The stainless steel housing looks professional. The controls are responsive and clear.
The vertical pan produces great sandwich bread. Slices are uniform in size. They fit perfectly in toasters.
Noise level stays reasonable. It’s quieter than my dishwasher. I can run it while watching TV without distraction.
The kneading paddle mixes thoroughly. I never found unmixed flour in corners. Every loaf had consistent texture.
Cleanup is genuinely easy. The non-stick pan releases bread perfectly. A quick wipe cleans it completely.
Why It’s Better
This machine balances features with simplicity. Some models offer 20+ programs you’ll never use. Twelve programs cover all practical needs.
The compact vertical design saves space. Traditional horizontal machines are bulky. This one fits in small kitchens.
Cuisinart’s reputation matters. They’ve made quality kitchen appliances for decades. Their customer service is reliable.
The price point is reasonable. At around $159, it’s not the cheapest. But the quality justifies the cost.
How It Performed
My first loaf came out perfect. The crust was golden and even. The interior was soft and fluffy.
I made white bread three times weekly. Results were consistent every time. No collapsed loaves. No dense spots.
Whole wheat bread worked well too. The machine handled heavier dough easily. The kneading paddle had enough power.
I tested the delay timer extensively. I set it for 8-hour delays. Fresh bread was ready every morning without fail.
The keep-warm function actually works. Bread stayed at perfect temperature for the full hour. No dried-out crusts.
Crust color settings were accurate. Light was truly light. Dark was genuinely dark. Medium hit the sweet spot.
The 2-pound setting made substantial loaves. They measured about 8 inches tall. Perfect for a family of four.
How I Clean It
Cleaning takes less than 5 minutes. The pan lifts right out after cooling.
I wipe the pan with a damp cloth. Crumbs brush away easily. The non-stick coating really works.
The kneading paddle pulls off smoothly. I wash it with warm soapy water. No special tools needed.
The lid and exterior wipe clean quickly. I use a soft cloth. No harsh cleaners required.
I clean the machine after every use. This prevents buildup. It stays looking new.
Testing Results
Loaf Quality: 9/10 – Consistently excellent bread
Ease of Use: 10/10 – Intuitive controls
Noise Level: 8/10 – Quiet enough for most times
Cleaning: 9/10 – Very easy maintenance
Value: 9/10 – Great features for the price
Overall Score: 9/10
This machine earned my top overall pick. It does everything most bakers need. The quality is outstanding. The price is fair.
2. OSIPOTO 2LB Bread Maker
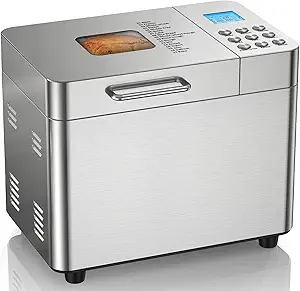
This machine surprised me. At under $100, I expected compromises. Instead, I found excellent performance and lots of features.
Product Features
The OSIPOTO offers 17 preset programs. That’s more than machines costing twice as much. Programs include basic bread, whole wheat, French bread, sweet bread, gluten-free, cake, jam, and yogurt.
You get three loaf sizes like other machines. Choose 1, 1.5, or 2 pounds based on your needs.
Three crust settings provide customization. Light, medium, and dark options give you control.
The 15-hour delay timer is the longest I tested. You can set it in the morning for bread after work.
A 60-minute keep-warm function maintains temperature. Your bread stays fresh and warm.
The 600-watt motor provides strong kneading power. It handles heavy doughs without struggling.
The viewing window lets you check progress. No need to open the lid and release heat.
The machine runs at just 50 decibels. That’s quieter than normal conversation.
Dimensions are 13.78″ deep by 11.42″ wide by 10.04″ high. It weighs 11.7 pounds.
What I Like
The price is unbeatable. At around $100, it costs much less than competitors. Yet it doesn’t feel cheap.
Seventeen programs offer variety. I made jam and yogurt in addition to bread. The versatility is impressive.
The quiet operation is remarkable. I ran it overnight without it waking anyone. The low 50-decibel noise level really delivers.
The non-stick pan is top quality. Bread releases without sticking. Cleaning is effortless.
The large viewing window is practical. I could check dough consistency without opening the lid. This helped me learn when to adjust recipes.
The control panel is beginner-friendly. Clear labels explain each function. My parents tried it and succeeded on the first attempt.
Why It’s Better
This machine offers premium features at a budget price. You get 17 programs for less than machines with 12.
The 15-hour delay timer beats competitors. Most max out at 13 hours. Those two extra hours add flexibility.
The quiet motor is a game-changer. I can start a loaf at night without worry. Other machines wake the household.
Build quality exceeds expectations. The stainless steel housing feels durable. Nothing feels flimsy or cheap.
How It Performed
My first loaf exceeded expectations. The crust was even and golden. The texture was perfect throughout.
I tested all 17 programs over several weeks. Basic bread worked flawlessly. Whole wheat came out dense and delicious.
The French bread program created a crispy crust. The inside was light and airy. It rivaled bakery baguettes.
I made jam using the jam program. It worked perfectly. The machine heated and stirred consistently.
Yogurt-making was simple too. I added milk and starter culture. Eight hours later, I had fresh yogurt.
The gluten-free program handled specialty flour well. My celiac friend loved the results. No dense, crumbly texture.
The 2-pound setting produced large loaves. They measured slightly smaller than the Cuisinart’s output. Still plenty for most families.
How I Clean It
Cleaning is incredibly simple. The non-stick pan makes it foolproof.
The pan releases bread without residue. I wipe it with a damp cloth. Everything comes off easily.
The kneading paddle detaches quickly. I soak it briefly if dough stuck. Usually, a quick rinse suffices.
The exterior stainless steel wipes clean. I use a microfiber cloth. No streaks or smudges remain.
The viewing window occasionally needs cleaning. Condensation can leave water spots. A quick wipe keeps it clear.
Total cleaning time averages 3-4 minutes. Even faster than the Cuisinart.
Testing Results
Loaf Quality: 8.5/10 – Excellent bread quality
Ease of Use: 10/10 – Very beginner-friendly
Noise Level: 10/10 – Remarkably quiet
Cleaning: 10/10 – Easiest cleanup tested
Value: 10/10 – Incredible price-to-feature ratio
Overall Score: 9/10
This machine is my top budget pick. The value is extraordinary. Performance matches machines costing much more.
3. Cuisinart CBK-210 Convection Bread Maker
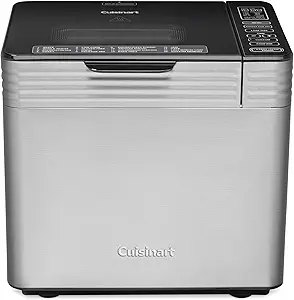
This is the premium option. The convection fan sets it apart. If you want bakery-quality results, this machine delivers.
Product Features
The Cuisinart CBK-210 offers 16 preset programs. Four more than the compact model. These include artisan dough and specialty programs.
The convection fan is the star feature. It circulates hot air evenly. This creates superior crust color and texture.
An automatic fruit and nut dispenser adds ingredients at the right time. No need to watch and wait. The machine handles timing.
Three crust colors and three loaf sizes provide customization. Same as the other models.
A 13-hour delay timer offers convenience. Set it and forget it.
The custom program feature lets you adjust settings. Control knead time, rise time, and baking time manually. Perfect for experimenting.
The machine measures 12.25″ deep by 8.85″ wide by 13″ high. It weighs 10.8 pounds.
What I Like
The convection fan makes a real difference. Crust color is more even. Texture is superior. The bread looks professional.
The automatic dispenser is convenient. I added raisins and nuts to the dispenser. They mixed in perfectly during kneading.
Build quality is exceptional. This feels like a commercial appliance. Every component is solid and well-made.
The custom program unlocks creativity. I adjusted rise times for sourdough. I tweaked baking times for different flours.
The included accessories are helpful. A measuring cup, spoon, and extra kneading hook come in the box.
The horizontal baking pan creates traditional loaf shapes. Some people prefer this over vertical loaves.
Why It’s Better
The convection fan is worth the premium price. Air circulation creates bakery-quality crusts. The difference is visible and tastable.
The automatic dispenser saves hassle. Adding ingredients manually requires timing. This dispenser handles it automatically.
Sixteen programs cover advanced baking needs. The artisan dough setting creates rustic breads. The specialty programs handle unique recipes.
The custom feature appeals to serious bakers. Once you master basics, you’ll want this control. It lets you perfect your recipes.
How It Performed
The first loaf impressed me immediately. The crust was evenly golden brown. No light or dark spots appeared.
I compared loaves against the compact model. The convection version had noticeably better crust. Texture was slightly lighter too.
The automatic dispenser worked flawlessly. I made raisin bread five times. Fruit distributed evenly every time.
I tested the custom program extensively. I created a recipe for honey oat bread. After three tries, I perfected it.
The artisan dough setting produced excellent results. I shaped the dough into baguettes after the cycle. They baked beautifully in my oven.
The machine handled heavy doughs easily. I made a dense multi-grain loaf. The kneading paddle powered through without issues.
Crust color control is extremely accurate. The light setting gives barely-there browning. The dark setting creates a thick, crunchy shell.
How I Clean It
Cleaning takes slightly longer than other models. The horizontal pan has more surface area.
The non-stick coating still works excellently. Bread releases cleanly. I wipe the pan with a damp cloth.
The automatic dispenser needs attention. Sticky ingredients can leave residue. I clean it after each use with fruit or nuts.
The kneading paddle requires normal cleaning. I wash it with soap and water. No special care needed.
The exterior wipes clean easily. Stainless steel maintains its appearance.
Total cleaning time is about 6-7 minutes. Slightly longer than the other models, but still manageable.
Testing Results
Loaf Quality: 10/10 – Best bread I’ve made at home
Ease of Use: 9/10 – Slightly more complex controls
Noise Level: 7/10 – Louder than OSIPOTO
Cleaning: 8/10 – Good, but dispenser needs care
Value: 8/10 – Premium price, but worth it
Overall Score: 9/10
This machine is my premium pick. The convection fan justifies the higher price. Serious bakers will appreciate the results.
Buying Guide: How to Choose a Bread Machine
Consider Your Budget
Bread machines range from $80 to $400. More money doesn’t always mean better bread.
The OSIPOTO proves budget machines can excel. At under $100, it competes with $200 models.
Mid-range machines like the Cuisinart CBK-110NAS balance features and price. They offer everything most people need.
Premium machines add conveniences. Convection fans and automatic dispensers cost more. Decide if these features matter to you.
Think About Loaf Size
Most machines offer 1, 1.5, and 2-pound options. Consider your household size.
Singles or couples rarely need 2-pound loaves. A 1-pound setting works better. Bread stays fresher when you make it more often.
Families of four or more benefit from 2-pound capacity. One loaf can feed everyone for a few days.
Actual loaf sizes vary between machines. Some “2-pound” settings produce smaller loaves. Check reviews for real-world measurements.
Evaluate Programs Needed
Basic machines offer 8-10 programs. Advanced models have 15-20.
Most people use just 3-4 programs regularly. Basic white, whole wheat, and quick bread cover common needs.
Extra programs add versatility. Jam, yogurt, and dough-only cycles expand possibilities.
Don’t pay extra for programs you’ll never use. Decide what you’ll actually make.
Check Noise Levels
Bread machines knead dough vigorously. This creates noise.
Some machines are loud enough to disrupt conversation. Others run quietly in the background.
If you plan to use delay timers overnight, quiet operation matters. Look for machines rated at 50-60 decibels.
The OSIPOTO is the quietest I tested. The Cuisinart models are moderate in volume.
Consider Counter Space
Bread machines are bulky. Measure your available space before buying.
Vertical machines like the Cuisinart CBK-110NAS save space. They have smaller footprints.
Horizontal machines are wider. They need more counter room.
Some people store their machines in cabinets. Consider whether you’ll keep yours out or put it away.
Look for Quality Construction
Build quality affects longevity. Cheap plastic housing cracks over time.
Stainless steel exteriors last longer. They also look better in kitchens.
Check the kneading paddle. Metal paddles outlast plastic versions.
Read reviews about durability. See how machines perform after a year of use.
Evaluate Cleaning Ease
You’ll clean your machine after every use. Easy maintenance matters.
Non-stick pans are essential. Bread should release cleanly without scraping.
Removable parts simplify cleaning. The pan and paddle should detach easily.
Some machines have more crevices where crumbs hide. Simpler designs clean faster.
Consider Timer Functions
Delay timers let you load ingredients and set a start time. This is incredibly convenient.
Most machines offer 12-13 hour timers. The OSIPOTO offers 15 hours.
Longer timers add flexibility. You can prepare ingredients in the morning for evening bread.
Keep-warm functions maintain temperature after baking. Look for at least 60 minutes.
Check Viewing Windows
Viewing windows let you check progress without opening the lid. This prevents heat loss.
Large windows are more useful than small ones. You can see the entire loaf.
Some machines don’t have windows at all. This isn’t a deal-breaker, but windows are nice.
Tips for Better Bread Machine Results
Use Fresh Ingredients
Flour goes stale over time. Buy smaller quantities and use them quickly.
Yeast loses potency with age. Check expiration dates. Store yeast in the refrigerator.
Water temperature matters. Too hot kills yeast. Too cold slows rising. Use water between 80-90°F.
Measure Accurately
Bread baking requires precision. Use measuring cups and spoons properly.
A kitchen scale is even better. Weighing ingredients ensures consistency.
Too much flour makes dense bread. Too little creates flat loaves.
Add Ingredients in the Right Order
Most machines want liquids first. Then add dry ingredients. Yeast goes on top.
This prevents yeast from activating too early. It ensures proper mixing.
Keep yeast away from salt initially. Salt can inhibit yeast activity.
Don’t Lift the Lid During Rising
Curiosity tempts you to check progress. Resist this urge during rising cycles.
Opening the lid releases heat. This affects rising and final texture.
Use the viewing window if your machine has one. Otherwise, trust the process.
Experiment with Recipes
Start with basic recipes included in the manual. These are tested to work.
Once you master basics, try variations. Add herbs, cheese, or dried fruit.
Keep notes on what works. Record ingredient amounts and results.
The custom program on advanced machines helps. You can adjust timing to perfect your recipes.
Remove Bread Promptly
Most machines keep bread warm for an hour. Remove it sooner if possible.
Leaving bread in the pan too long creates condensation. This softens the crust.
Transfer bread to a cooling rack immediately. This preserves crust texture.
Clean After Every Use
Don’t let crumbs and dough residue build up. Clean the machine after each loaf.
This prevents stuck-on messes that become harder to remove.
Regular cleaning extends machine life. It also prevents off-flavors in future loaves.
Common Problems and Solutions
Bread Doesn’t Rise
Check your yeast freshness first. Old yeast won’t activate properly.
Verify water temperature. Too hot or cold affects rising.
Make sure yeast doesn’t touch salt or sugar initially. These inhibit activation.
Loaf Collapses
This usually means too much liquid. Reduce water slightly next time.
It can also indicate too much yeast. Follow recipe amounts carefully.
High altitude affects baking. Reduce liquid and yeast slightly if you live above 3,000 feet.
Dense, Heavy Texture
You probably used too much flour. Measure carefully next time.
Old flour can also cause density. Use fresh flour for best results.
Make sure the kneading paddle is attached correctly. Poor mixing creates dense spots.
Crust Too Dark or Light
Adjust the crust color setting. This seems obvious but people forget.
Some flours brown differently. Whole wheat creates darker crusts naturally.
Check your machine’s position. Direct sunlight can affect baking.
Paddle Stuck in Bread
This happens when bread cools completely in the pan. Remove bread promptly.
If the paddle is already stuck, run hot water over the bottom. It should release.
Some machines have better paddle release than others. Non-stick coatings help.
Uneven Mixing
Make sure ingredients are layered properly. Liquids first, then dry, yeast on top.
The kneading paddle might be loose. Check that it’s firmly attached.
Some recipes are too thick for machines. Reduce ingredients slightly.
Frequently Asked Questions
How long does homemade bread last?
Homemade bread lasts 3-4 days at room temperature. Store it in a sealed bag or container. It contains no preservatives, so it gets stale faster than store bread. You can freeze slices for up to 3 months.
Can I use bread machine for gluten-free bread?
Yes, most machines have gluten-free settings. Use special gluten-free flour blends. These breads require different mixing and rising times. The texture will differ from wheat bread but can still be delicious.
Do I need to use bread machine yeast?
No, regular active dry yeast works fine. Bread machine yeast dissolves faster, but both types work. Some bakers prefer instant yeast for its reliability. Just follow recipe amounts carefully.
Can I make dough only without baking?
Yes, all machines I tested have dough-only cycles. This lets you shape bread manually. You can make rolls, baguettes, or pizza dough. Then bake them in your regular oven.
Why does my bread have a hole in the bottom?
The kneading paddle creates this hole. Some machines let you remove the paddle before the final rise. Otherwise, just pull it out after baking. The hole is normal and doesn’t affect taste.
Can I double a recipe in a 2-pound machine?
No, never exceed the maximum capacity. Dough needs room to rise. Overfilling causes overflow and messy cleanup. Stick to the recommended amounts for your machine size.
How much electricity does a bread machine use?
Most machines use 550-650 watts. A typical 3-hour cycle costs about 15-20 cents in electricity. This is much cheaper than buying bakery bread. The savings add up quickly.
Final Thoughts
After three months of testing, I can’t imagine life without a bread machine. Fresh bread transformed my meals.
The Cuisinart CBK-110NAS is my top overall pick. It balances features, quality, and price perfectly. Most people will love this machine.
The OSIPOTO offers incredible value. At under $100, it competes with machines costing twice as much. Budget shoppers should grab this one.
The Cuisinart CBK-210 satisfies serious bakers. The convection fan creates professional results. It’s worth the premium price if you bake often.
Any of these machines will serve you well. Choose based on your budget and needs. You’ll enjoy fresh bread within days.
The smell of baking bread fills my home daily now. My family looks forward to warm slices with dinner. Store-bought bread tastes bland in comparison.
Start with simple recipes. Master the basics. Then experiment with flavors and ingredients. You’ll develop favorites quickly.
Bread machines aren’t just for bread either. I make pizza dough, jam, and yogurt in mine. The versatility surprised me.
The investment pays off fast. After making 30 loaves, you’ll save money compared to bakery purchases. Plus, you control every ingredient.
Don’t wait to start baking. Pick a machine today. Your first warm slice of homemade bread will convince you.
Happy baking!