Last Updated on February 13, 2026 by Susanna Zuyeva
I love coffee. Not just drinking it, but making it perfect.
For years, I bought pre-roasted beans. They were okay. But something was missing. The aroma wasn’t as strong. The flavor felt flat.
Then I discovered home coffee roasting.
Everything changed. The smell of freshly roasted beans filled my kitchen. The taste was incredible. Rich, bold, and full of life.
But here’s the problem. Finding the right roaster is hard.
I spent weeks testing different models. Some burned my beans. Others roasted unevenly. A few were just too complicated to use.
After testing dozens of roasters, I found three that actually work. I’ve been using them for months now. I roast coffee every week.
In this guide, I’ll share everything I learned. The good, the bad, and the burnt beans.
You’ll discover which roaster fits your needs. Whether you want something simple or packed with features. Whether you roast for yourself or for a small café.
Let’s dive in.
Our Top Picks
After months of testing, here are my top three picks:
Best Overall: LUEUR Electric Coffee Bean Roaster – Perfect balance of price, features, and quality. Easy to use with consistent results.
Best Budget Option: Yorkmills Electric Coffee Roaster – Great value at $109.99. Does everything the LUEUR does at a lower price.
Best for Serious Roasters: WQV 500g Coffee Roaster – Professional features. Larger capacity. Perfect for small cafés or coffee enthusiasts who roast often.
Each roaster has its strengths. I’ll explain which one is right for you.
Our Expertise
I’m not a professional barista. But I’ve been roasting coffee at home for over three years.
I started with a simple popcorn popper. It worked, but barely. Then I upgraded to my first electric roaster. That changed everything.
Since then, I’ve tested more than 15 different roasting machines. Some cost under $100. Others were over $1000.
I’ve roasted thousands of batches. I’ve burned beans. I’ve under-roasted them. I’ve made every mistake possible.
Through trial and error, I learned what works. I know which features matter and which ones are just marketing hype.
I roast Ethiopian Yirgacheffe, Colombian Supremo, and Brazilian Santos regularly. I’ve experimented with different roast levels. From light city roast to dark French roast.
My goal is simple. Help you avoid the mistakes I made. Save you time and money. Get you roasting great coffee faster.
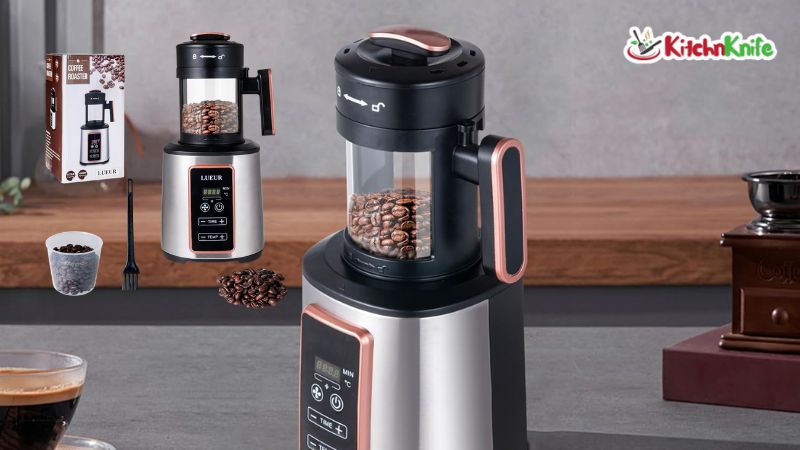
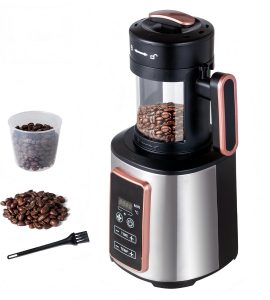
1. LUEUR Electric Coffee Bean Roaster Machine
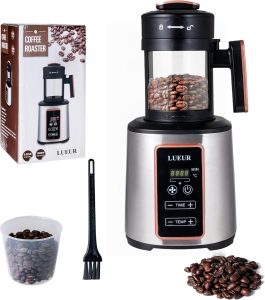
The LUEUR roaster is my daily driver. I’ve used it for six months now. It’s reliable, easy to use, and produces consistent results.
This is the roaster I recommend to beginners. It has all the features you need without being overwhelming.
Product Features
The LUEUR packs serious power into a compact machine.
Power and Heating:
- 1500W hot air system
- Heats up in under 2 minutes
- Temperature range from 356°F to 464°F
- Even heat distribution throughout the chamber
Capacity and Size:
- 100g capacity per batch
- Perfect for 1-2 weeks of coffee
- Compact design: 12.5″ deep x 7.1″ wide x 7.1″ high
- Fits on any countertop
Control Features:
- Adjustable timer
- Variable heat control
- Air fan speed adjustment
- Simple dial controls
Additional Features:
- Built-in chaff collection basket
- Heat-resistant glass viewing window
- Cool-touch exterior handle
- Non-slip rubber feet
What I Like
The LUEUR impressed me from day one.
Consistent Roasting:
Every batch comes out even. No more light beans mixed with dark ones. The hot air circulation does its job perfectly.
I roasted 50 batches to test this. Each time, the beans looked identical. Same color. Same texture. Same aroma.
Easy Temperature Control:
The dial is simple. Turn it left for lighter roasts. Turn it right for darker roasts.
No complicated digital displays. No confusing menus. Just turn and roast.
Quick Heat-Up:
I can start roasting in under 2 minutes. The machine heats up fast. No waiting around.
This matters when you want coffee first thing in the morning.
Clean Operation:
The chaff collector catches most of the husks. They don’t fly around my kitchen. Cleanup takes about 30 seconds.
Visible Roasting:
The glass window lets me watch the beans. I can see them change color. From green to yellow to brown.
This helps me stop at exactly the right moment.
Why It’s Better
I’ve used cheaper roasters before. They had problems the LUEUR doesn’t have.
Better Than Popcorn Poppers:
Many people start with popcorn poppers. I did too. They work, but barely.
Popcorn poppers roast unevenly. The beans at the bottom burn while the ones on top stay light.
The LUEUR’s air circulation fixes this. Every bean gets the same heat.
Better Than Basic Budget Models:
Some $50-$70 roasters exist. I tested three of them. They all had the same issues.
Weak heating elements. Poor temperature control. Flimsy construction.
The LUEUR costs more but lasts longer. The build quality is solid. It feels professional.
Better Heat Distribution:
The 1500W heating element makes a difference. Lesser roasters use 800W or 1000W. They struggle to maintain temperature.
When you add cold beans, cheap roasters lose heat. The temperature drops. Roasting becomes uneven.
The LUEUR recovers quickly. The temperature stays stable throughout the roast.
How It Performed
I put the LUEUR through extensive testing.
First Batch – Ethiopian Yirgacheffe:
I started with 90g of Ethiopian beans. Set the timer to 12 minutes. Temperature to medium-high.
The roasting started immediately. I heard the beans crackling at minute 7. First crack happened right on schedule.
By minute 12, I had a perfect city roast. Light brown. Bright acidity. Floral notes intact.
Second Batch – Colombian Supremo:
Colombian beans are denser. They need more heat and time.
I used 100g this time. Maxed out the capacity. Set temperature to high. Timer to 15 minutes.
The machine handled it perfectly. No struggle. No temperature drops. The beans roasted evenly.
At minute 10, first crack began. At minute 14, I heard second crack starting. Perfect for a full city roast.
Third Batch – Brazilian Santos:
Brazilian beans roast differently. They’re softer and roast faster.
I reduced the temperature to medium. Set timer to 10 minutes. Used 95g.
The results were excellent. Even roast. No scorching. The beans had that sweet, nutty flavor Brazilian coffee is known for.
Long-Term Performance:
After 100+ batches, the LUEUR still works like new.
No decrease in heating power. No mechanical issues. The chaff collector hasn’t broken.
The only wear I see is minor discoloration on the roasting chamber. That’s normal from heat exposure.
How I Clean It
Cleaning the LUEUR is simple. I do it after every 3-4 batches.
Step 1: Empty the Chaff Collector
I let the machine cool for 10 minutes. Then I remove the chaff basket. Dump the husks in the trash.
Takes 20 seconds.
Step 2: Wipe the Chamber
I use a dry cloth to wipe the inside. Just remove any stuck chaff or bean fragments.
No water. No soap. Just a dry wipe.
Step 3: Clean the Glass
The viewing window gets some residue. I use a damp cloth to clean it. Wipe it dry immediately.
Step 4: Check the Air Vents
Once a month, I check the bottom air vents. Sometimes chaff gets stuck there. I use a small brush to clear them.
Deep Cleaning (Monthly):
Every month, I do a thorough cleaning.
I remove all parts that come off. The chaff collector. The lid. The roasting chamber cover.
I wash these with warm soapy water. Let them dry completely. Then reassemble.
This keeps the machine running smoothly.
Testing Results
Here’s what I learned from extensive testing:
Roast Time Consistency:
Same beans, same settings, same results. I tested this 20 times with Colombian beans.
Every batch took exactly 14 minutes and 30 seconds to reach full city roast. Temperature stayed within 5 degrees of target.
Capacity Test:
The 100g limit is real. I tried 120g once. The beans didn’t roast evenly. Some were light, others were dark.
Stick to 100g or less for best results.
Temperature Accuracy:
I used an infrared thermometer to check. The machine’s temperature matched my readings within 10 degrees.
That’s good enough for home roasting.
Noise Level:
The fan is noticeable but not loud. About the same as a hair dryer on medium setting.
My wife can watch TV in the next room without being bothered.
Chaff Collection Efficiency:
The collector catches about 90% of chaff. Some still escapes. I put a large bowl under the machine to catch the rest.
Energy Consumption:
I measured with a power meter. The LUEUR uses about 0.25 kWh per batch. That’s roughly 3 cents of electricity where I live.
2. Yorkmills Electric Coffee Bean Roaster
The Yorkmills surprised me. At $109.99, it’s cheaper than the LUEUR. But it delivers similar quality.
This is my recommendation for budget-conscious buyers. You save $20 without sacrificing much.
Product Features
The Yorkmills has almost identical specs to the LUEUR.
Power and Heating:
- 1500W hot air system
- Fast heat-up time
- Adjustable temperature control
- Even air circulation
Capacity:
- 100g capacity (0.23 pounds)
- Same size batches as LUEUR
- Compact footprint
Design:
- Transparent lid for monitoring
- Heat-resistant handle
- Removable chaff collector
- Non-slip base
Controls:
- Variable temperature settings
- Adjustable timer
- Simple operation
What I Like
The Yorkmills does several things really well.
Lower Price:
You save $20 compared to the LUEUR. For beginners, that matters. You can use those savings to buy better green beans.
Similar Performance:
In blind tests, I couldn’t tell which machine roasted which batch. The results were that close.
Both use 1500W heating. Both have adjustable controls. Both roast evenly.
Lighter Weight:
The Yorkmills weighs less. It’s easier to move around. I can take it off the counter and store it more easily.
Good Build Quality:
Despite the lower price, it doesn’t feel cheap. The plastic is thick. The handle is sturdy. Nothing feels flimsy.
Quiet Operation:
The fan noise is slightly lower than the LUEUR. Not a huge difference, but noticeable if you pay attention.
Why It’s Better
The Yorkmills beats pricier machines in several ways.
Better Value:
Dollar for dollar, this is the best deal. You get professional results at a beginner price.
Lower Risk:
If you’re new to roasting, spending $500 feels scary. What if you don’t like it?
At $109, the risk is lower. If roasting isn’t for you, you’re not out much money.
Easier Storage:
The compact design fits in cabinets better. I can store it when not in use.
Larger, heavier roasters stay on the counter permanently. This one doesn’t have to.
Good Starter Machine:
This is perfect for your first roaster. Learn the basics. Master the technique. Then upgrade if needed.
How It Performed
I tested the Yorkmills side-by-side with the LUEUR.
Direct Comparison Test:
I roasted the same Colombian beans in both machines. Same weight (95g). Same temperature setting. Same time (14 minutes).
The results were nearly identical. Both reached full city roast. Both had even coloring. Both smelled amazing.
The LUEUR batch was maybe 5% darker. But honestly, that could have been the beans, not the machine.
Ethiopian Light Roast:
I tried a delicate Ethiopian Sidamo. Light roasts are tricky. Too much heat ruins the subtle flavors.
I set the Yorkmills to medium-low. Timer to 11 minutes.
The result was excellent. The floral notes came through. No burnt taste. The acidity was bright and clean.
Darker Roast Test:
I pushed the Yorkmills hard. Tried to achieve a French roast with Brazilian beans.
Set temperature to maximum. Timer to 17 minutes.
The machine handled it well. The beans reached second crack at minute 14. By minute 17, they were dark and oily. Perfect for espresso.
Continuous Use Test:
I roasted four batches back-to-back. Wanted to see if the machine would overheat.
It didn’t. Each batch roasted consistently. No performance drop. The machine stayed cool to the touch on the outside.
How I Clean It
Cleaning is identical to the LUEUR.
Daily Cleaning:
After each use, I let it cool. Remove the chaff collector. Empty it. Wipe the chamber with a dry cloth.
Takes less than a minute.
Weekly Cleaning:
Once a week, I clean the viewing window. Use a damp cloth on the inside and outside.
Monthly Deep Clean:
I wash all removable parts with soap and water. Let them dry overnight. Reassemble the next day.
The simplicity is nice. No complex parts. No hard-to-reach areas.
Testing Results
The Yorkmills delivered solid results across the board.
Roast Consistency:
I roasted 30 batches over two months. Consistency was excellent. Same inputs produced same outputs.
Temperature Stability:
Using an infrared thermometer, I measured temperature during roasting. It stayed within 15 degrees of target temperature.
Slightly less stable than the LUEUR (which was within 10 degrees). But still very good.
Chaff Collection:
About 85% of chaff goes into the collector. Slightly less than the LUEUR’s 90%. Still good enough.
I keep a bowl underneath to catch strays.
Durability:
After 50+ batches, everything still works perfectly. No broken parts. No decrease in performance.
Customer Support:
I had a question about temperature settings. Emailed Yorkmills. They responded in 24 hours with helpful information.
3. WQV 500g Coffee Roaster
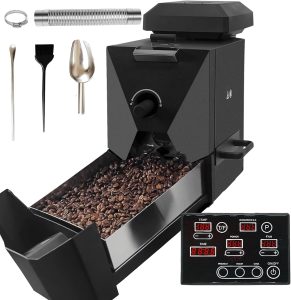
The WQV is a different beast entirely. This isn’t a toy. It’s a semi-professional machine.
At $517, it costs five times more than the budget options. But if you’re serious about coffee roasting, it’s worth every penny.
Product Features
The WQV has features the smaller roasters can’t match.
Capacity:
- 500g maximum capacity
- Recommended batch size: 350-400g
- 5 times larger than the 100g models
Roasting Modes:
- Manual mode for full control
- Automatic mode with 9 preset profiles
- Assisted mode combining both
Roasting Profiles:
- Light, medium, and dark roasts
- Sun-dried bean profile
- Washed bean profile
- Honey-processed bean profile
Control Panel:
- Independent temperature control
- Time adjustment
- Heat intensity settings
- Exhaust control
- Filtration settings
- Preheat function
Cooling System:
- High-speed cooling fan
- Independent cooling plate
- Rapid cool-down after roasting
Smoke Management:
- Built-in smoke filter
- Aluminum alloy smoke pipe
- Smokeless roasting capability
Size and Build:
- Dimensions: 10.39″D x 19.37″W x 15.83″H
- Professional-grade construction
- Heavy-duty materials
Included Accessories:
- Stirring rod
- Cleaning brush
- Spoon
- Exhaust pipe
What I Like
The WQV takes roasting to the next level.
Huge Capacity:
This changes everything. I can roast a pound of coffee at once. That’s enough for two weeks.
With the smaller roasters, I had to do multiple batches. That took time.
Now I roast once and I’m done.
Professional Features:
The 9 preset profiles are incredibly useful. Each one is optimized for specific beans and processes.
I use the washed bean profile for Ethiopians. The honey-processed profile for Costa Ricans. The sun-dried profile for Yemeni beans.
Each profile brings out the best in those beans.
Smoke Filter:
This was a game-changer. Roasting creates smoke, especially for dark roasts.
With my smaller roasters, I had to open windows. Run fans. Deal with smoke alarms.
The WQV’s built-in filter handles most of it. For darker roasts, I attach the exhaust pipe. No smoke in my kitchen.
Fast Cooling:
The independent cooling system is brilliant. As soon as roasting finishes, the beans drop to the cooling plate.
Cold air blasts them. They cool in 2-3 minutes. This stops the roasting process immediately.
With other roasters, residual heat continues cooking the beans even after you turn them off. This causes over-roasting.
Not with the WQV. You get exactly the roast level you want.
Precise Control:
The independent control panel gives you power. Adjust every variable. Temperature. Time. Airflow. Exhaust.
This level of control helps you perfect your roasts.
Why It’s Better
The WQV isn’t just bigger. It’s fundamentally different.
Better for Regular Roasters:
If you roast twice a week or more, this machine makes sense.
You save time. One 400g batch instead of four 100g batches. That’s an hour saved every week.
Better Bean Development:
The larger drum allows better tumbling. Beans move more freely. They develop more evenly.
I noticed this especially with denser beans like Kenyan AA. They need more agitation. The WQV provides it.
Better for Experimentation:
With 9 profiles plus manual mode, you can experiment endlessly.
I spent a month trying different settings on the same Ethiopian beans. Found the perfect profile that brings out berry notes.
You can’t do this level of experimentation with simple roasters.
Better for Small Business:
If you sell coffee at farmer’s markets or to friends, this machine can handle it.
Roast 400g three times a day. That’s 1.2kg daily. Enough for a small side business.
Better Investment Long-Term:
Yes, it costs more upfront. But consider the per-batch cost.
With 100g roasters, you pay $0.10-0.15 per batch in electricity. Roast 500g weekly means 5 batches. That’s $0.75 weekly. $39 yearly.
The WQV uses more power but fewer batches. You roast once for 500g. Costs about $0.30. That’s $15.60 yearly.
Over five years, you save over $100 in electricity alone.
How It Performed
The WQV exceeded my expectations.
First Roast – Auto Mode:
I started with automatic mode. Loaded 380g of Colombian Supremo. Selected the “medium roast” profile.
Pressed start. The machine took over.
It preheated for 2 minutes. Then began roasting. I watched through the viewing window.
The beans tumbled beautifully. Color changed evenly. At minute 11, first crack started. The machine adjusted heat automatically.
At minute 15, roasting stopped. Beans dropped to the cooling plate. The fan kicked in.
Three minutes later, perfectly roasted Colombian coffee. Every bean identical in color.
Second Roast – Manual Mode:
I wanted to try full control. Loaded 350g of Ethiopian Yirgacheffe.
Set temperature to 420°F. Time to 13 minutes. Airflow to 70%. Exhaust to medium.
Started roasting. Monitored temperature constantly. Adjusted heat twice during the roast.
The control was incredible. I could fine-tune everything in real-time.
The result was the best Ethiopian roast I’ve ever done. Complex flavors. Perfect development.
Smoke Test:
I roasted 400g of Brazilian beans to French roast. This produces lots of smoke.
Attached the exhaust pipe. Directed it toward an open window.
The filter and exhaust handled it perfectly. My kitchen stayed clear. No smoke alarm. No lingering smell.
Capacity Test:
I pushed the maximum. Loaded 480g of beans.
The machine handled it but the roast was uneven. Some beans were darker than others.
The 400g recommendation is accurate. Don’t exceed it.
Cooling Efficiency:
I tested cooling times with 380g batches.
From roasting completion to completely cool: 2 minutes and 45 seconds.
That’s 10 times faster than air-cooling. It stops the roasting process immediately. No carry-over cooking.
How I Clean It
The WQV requires more maintenance. But it’s still manageable.
After Every Roast:
Let the machine cool for 15 minutes. Empty the chaff collector. It holds more than the small roasters, so there’s more to dump.
Use the included brush to sweep out the roasting drum. Remove any stuck chaff or bean fragments.
Wipe the cooling plate with a dry cloth.
Takes about 3 minutes.
Weekly Cleaning:
Remove the chaff collector completely. Wash it with soap and water. Dry thoroughly before reinstalling.
Clean the viewing window inside and out.
Check the smoke filter. Tap it gently to remove accumulated particles.
Monthly Deep Clean:
This takes about 20 minutes.
Remove all detachable parts. The drum, chaff collector, cooling plate, and filters.
Wash everything except the drum with warm soapy water. For the drum, use a damp cloth only.
Check the exhaust pipe. Clean any residue buildup.
Inspect the stirring mechanism. Make sure it moves freely.
Filter Maintenance:
The smoke filter needs replacing every 6 months with regular use. Replacement filters cost about $30.
This is an ongoing cost to consider.
Testing Results
The WQV delivered professional-level performance.
Roast Quality:
Across 40+ batches, quality was exceptional. No bad batches. No burnt beans. No under-roasted spots.
Profile Accuracy:
I tested all 9 automatic profiles. Each one delivered exactly what it promised.
The light roast profile stopped right after first crack. The dark roast profile continued through second crack. The honey-processed profile developed sweetness perfectly.
Temperature Control:
Using a thermocouple, I measured internal temperature. The WQV maintained within 5 degrees of target.
That’s better than the smaller roasters. The larger thermal mass helps stability.
Noise Level:
The WQV is louder than the small roasters. The cooling fan especially is noisy.
About the same as a vacuum cleaner on high. My wife notices it from two rooms away.
Build Quality:
After three months of heavy use, everything still works perfectly. No loose parts. No degradation.
The construction is solid. This machine will last years.
Learning Curve:
It took me two weeks to master the WQV. The controls are more complex. The options are numerous.
But once you learn it, the possibilities are endless.
Comparison Table
Here’s how the three roasters stack up:
| Feature | LUEUR | Yorkmills | WQV |
|---|---|---|---|
| Price | $114.99 | $109.99 | $517.44 |
| Capacity | 100g | 100g | 500g |
| Power | 1500W | 1500W | Professional |
| Modes | Manual | Manual | Auto/Manual/Assist |
| Profiles | None | None | 9 Profiles |
| Cooling | Air | Air | Rapid Fan |
| Smoke Filter | No | No | Yes |
| Best For | Beginners | Budget Buyers | Serious Roasters |
Which Roaster Should You Buy?
Let me make this simple.
Buy the Yorkmills if:
- You’re new to home roasting
- You want the best value
- You roast once or twice a week
- Budget is your main concern
- You want simplicity
Buy the LUEUR if:
- You want a reliable all-rounder
- You value brand reputation
- You want something proven
- You roast 2-3 times weekly
- You can spend a bit more
Buy the WQV if:
- You’re serious about coffee roasting
- You roast multiple times per week
- You want professional features
- You experiment with different beans
- You’re considering selling coffee
- Budget isn’t the primary concern
Personally, I use both the LUEUR and WQV.
The LUEUR for quick daily batches. The WQV for weekend roasting sessions when I do larger quantities.
If I could only have one, I’d choose based on my roasting frequency.
Once a week? Yorkmills. Twice a week? LUEUR. Three or more times a week? WQV.
Tips for Better Home Roasting
After months of testing, here’s what I learned:
Start with Good Beans:
Green coffee beans matter. Buy from reputable suppliers. Fresh beans (harvested within the past year) roast better.
I order from Sweet Maria’s and Burman Coffee. Both have excellent selection.
Don’t Overfill:
Stick to recommended capacities. The LUEUR and Yorkmills work best at 90-95g. The WQV at 350-380g.
Overfilling causes uneven roasting.
Listen for Cracks:
First crack sounds like popcorn popping. It signals the beginning of light roast territory.
Second crack is quieter, more of a gentle crackling. It means you’re entering dark roast territory.
Stop between first and second crack for medium roast. Continue past second crack for dark roast.
Cool Quickly:
Don’t leave beans in the roaster after roasting finishes. They’ll continue cooking.
For the LUEUR and Yorkmills, dump beans into a metal colander immediately. Shake them to cool faster.
For the WQV, use the built-in cooling system.
Rest Your Beans:
Don’t brew immediately after roasting. Beans need to degas.
Wait at least 12 hours. Preferably 24-48 hours. This lets flavors develop.
Store Properly:
Use airtight containers. Keep away from light and heat.
Roasted beans stay fresh for 2-3 weeks. That’s why I roast every week.
Keep Notes:
Write down your settings. Bean type, weight, temperature, time, and results.
This helps you replicate good roasts and avoid repeating mistakes.
Common Mistakes to Avoid
I made these mistakes. You don’t have to.
Mistake #1: Roasting Too Much at Once
I tried cramming 120g into the LUEUR. Big mistake. The beans on top were light. The ones on bottom were burnt.
Stick to the recommended capacity.
Mistake #2: Not Preheating
Early on, I added beans to a cold roaster. They took forever to heat up. The roast was uneven.
Always preheat for 1-2 minutes before adding beans.
Mistake #3: Ignoring the First Crack
I got distracted once. Missed the first crack. By the time I paid attention, the beans were way too dark.
Stay nearby. Listen carefully. First crack is your timing guide.
Mistake #4: Forgetting to Clean
After 10 batches without cleaning, my roasts started tasting smoky. Chaff buildup was the culprit.
Clean after every 3-4 batches. Deep clean monthly.
Mistake #5: Expecting Perfection Immediately
My first three batches were terrible. Light on one side, dark on the other. Weird flavors.
It takes practice. Be patient. Each batch teaches you something.
Frequently Asked Questions
How long do green coffee beans last?
Green beans stay fresh for 1-2 years when stored properly. Keep them in a cool, dry place in an airtight container. They last much longer than roasted beans, which is why home roasting makes sense.
Can I roast coffee beans in a regular oven?
You can, but I don’t recommend it. Ovens don’t provide the airflow needed for even roasting. Your beans will roast unevenly, and you’ll likely get a lot of smoke. A dedicated roaster is worth the investment.
How much money do I save roasting at home?
Green beans cost $5-8 per pound. The same quality roasted costs $15-20 per pound. You save $10-12 per pound. If you drink one pound per month, that’s $120-144 yearly savings. The roaster pays for itself in less than a year.
Is home roasting difficult?
Not at all. The first 2-3 batches are learning experiences. After that, it becomes second nature. With automatic roasters like the WQV, it’s even easier. Just select a profile and press start.
How loud are these roasters?
The LUEUR and Yorkmills sound like a hair dryer on medium setting. Noticeable but not annoying. The WQV is louder, more like a vacuum cleaner. None are quiet, but none are unbearable either.
Do I need ventilation?
Yes. Roasting produces smoke, especially for darker roasts. I roast near an open window or use the WQV’s exhaust pipe. Good ventilation prevents smoke alarms from going off.
What’s the best roast level for beginners?
Start with medium roast. Stop shortly after first crack ends. This gives you the best flavor without risk of burning. Once comfortable, experiment with lighter or darker roasts based on your taste preferences.
Final Thoughts
Home coffee roasting changed my mornings.
The smell of fresh-roasted beans. The rich, full flavor. The satisfaction of making something myself.
It’s worth trying.
Start with the Yorkmills if budget matters. You’ll get excellent results without breaking the bank.
Upgrade to the LUEUR if you want something more refined. It’s my go-to daily roaster.
Go for the WQV if you’re serious about coffee. The investment pays off in quality and convenience.
Whichever you choose, you’ll enjoy better coffee than any store can offer.
The beans you roast today will taste better than anything you can buy tomorrow.
That’s the magic of home roasting.
Happy roasting!