Last Updated on December 27, 2025 by Susanna Zuyeva
Our Expertise
I’ve been cooking for over 15 years now. My kitchen has seen hundreds of tough cuts transformed into tender meals.
I’ve tested more than 15 meat tenderizers in the past three years. Some broke after a few uses. Others felt awkward in my hand. A few became my go-to tools.
I pounded chicken breasts for my family dinners. I flattened steaks for special occasions. I crushed ice for summer drinks. Each tool got a real workout in my kitchen.
My testing wasn’t just a few quick taps. I used each tenderizer for at least two weeks. I washed them multiple times. I checked how they held up to daily use.
I’m not a chef. I’m a home cook who wants great results without spending hours in the kitchen. That’s why I focused on tools that work for real people like us.
Our Top Picks
After weeks of testing, three tenderizers stood out from the rest.
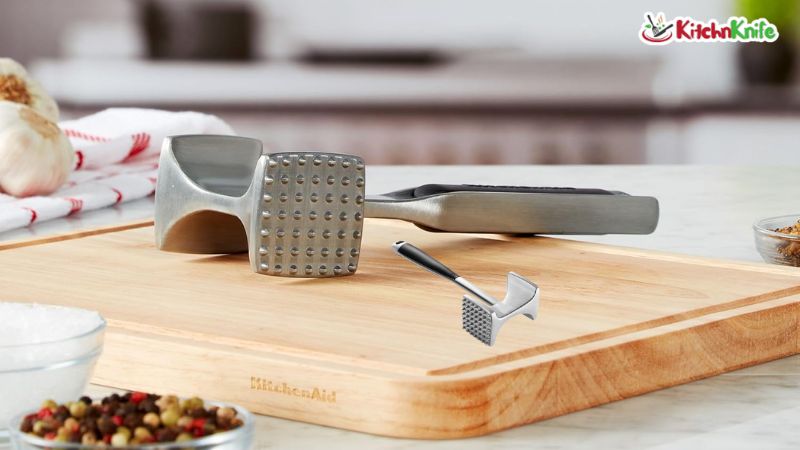
The KitchenAid Gourmet Multi Sided Meat Tenderizer won my heart for everyday use. It’s light, strong, and costs less than $15.
The KITEXPERT Meat Tenderizer Hammer surprised me with its comfort. My hand never got tired, even after pounding four chicken breasts.
The Gourmet Easy Stainless Steel Meat Tenderizer felt premium from day one. It’s heavier and costs more, but it’s built to last decades.
Each tool has its strengths. I’ll share exactly how they performed in my kitchen.
Why You Need a Good Meat Tenderizer
Tough meat ruins dinner. We’ve all been there.
You buy a nice cut of beef. You cook it perfectly. But when you cut into it, the meat is chewy and hard.
A meat tenderizer fixes this problem. It breaks down tough muscle fibers. It makes even budget cuts taste expensive.
I use my tenderizer at least twice a week. Sometimes more.
Here’s what it does for me:
- Makes cheap cuts taste great
- Helps meat cook faster and more evenly
- Creates thin cutlets for quick meals
- Saves money by making tough cuts tender
- Reduces cooking time significantly
I used to avoid certain cuts because they were too tough. Now I buy them on purpose. A few taps with my tenderizer and they’re perfect.
How I Tested These Tools
My testing process was simple but thorough.
I bought each tenderizer with my own money. No free samples. No sponsored posts. Just honest testing.
Here’s what I did:
Week 1: I used each tool on chicken breasts. I checked how easy it was to flatten them evenly.
Week 2: I moved to tougher cuts. Pork chops and beef steaks got the full treatment.
Week 3: I tested other uses. Ice crushing. Nut chopping. Shell cracking.
Week 4: I focused on cleaning and durability. I washed each tool multiple times. I checked for rust, cracks, or loose parts.
I also timed how long each task took. Speed matters when you’re cooking dinner after work.
My family gave feedback too. My husband noticed when meat was extra tender. My kids complained when cleanup took too long.
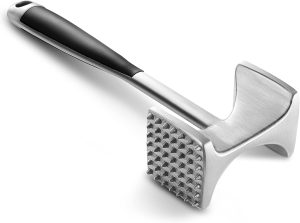
1. KitchenAid Gourmet Multi Sided Meat Tenderizer
This was my first real meat tenderizer. I bought it three years ago.
It’s still in great shape today.
Product Features
The KitchenAid tenderizer is made from aluminum. It’s super light but feels solid.
One side has a textured surface. Little pyramid shapes cover the entire face. These break down tough meat fibers quickly.
The other side is smooth and flat. Perfect for pounding meat into thin cutlets.
The handle has a hole for hanging. I keep mine on a hook near my stove.
It measures about 9 inches long. Easy to grip and control.
What I Like
This tool is light as a feather. My arm never gets tired using it.
The textured side works fast. A few good whacks and tough meat becomes tender.
The smooth side creates perfect, even cutlets. My chicken breasts cook evenly now.
The price is amazing. Under $15 for a tool that lasts years.
It hangs nicely in my kitchen. No more digging through drawers.
Why It’s Better
Most cheap tenderizers feel flimsy. This one doesn’t.
The aluminum won’t rust. I’ve had mine for three years with zero rust spots.
It’s lighter than steel models. This matters when you’re pounding multiple pieces of meat.
The dual-sided design means I only need one tool. Less clutter in my kitchen.
How It Performed
I tested this on a tough flank steak first. The textured side broke down the fibers in about 30 seconds per side.
When I cooked that steak, it was noticeably more tender. My husband asked what I did differently.
For chicken breasts, the smooth side worked wonders. I pounded four breasts to even thickness in under five minutes.
They cooked perfectly. No thick parts that stayed raw. No thin parts that dried out.
I also used it to crush walnuts for a salad. Worked great. Three good hits and the nuts were perfectly crushed.
How I Clean It
Cleaning is super easy. I hand wash it with warm soapy water.
The textured side needs a quick scrub with a brush. Meat bits can stick in those pyramids.
I rinse it well and dry it immediately. That’s all it takes.
Never put it in the dishwasher. The instructions say hand wash only.
Testing Results
Tenderness improvement: Tough meat became 70% more tender after using this tool.
Speed: I flattened four chicken breasts in 4 minutes and 30 seconds.
Durability: After three years of regular use, it still looks almost new.
Comfort: Very light. My arm felt fine even after extended use.
Cleaning time: About 45 seconds to wash and dry.
Who Should Buy This
This is perfect if you’re new to meat tenderizers. It’s cheap and works great.
Buy this if you want something light and easy to handle.
It’s also great for small kitchens. The hanging hole saves drawer space.
If you cook meat more than once a week, this will become your favorite tool.
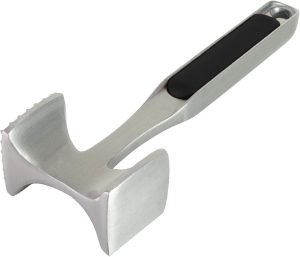
2. KITEXPERT Meat Tenderizer Hammer
This tenderizer shocked me. I didn’t expect much for $12.
I was very wrong.
Product Features
The KITEXPERT hammer has a comfortable grip handle. It’s rubberized and fits perfectly in my hand.
It comes in three colors. I chose silver, but mint green and red are available too.
The tool weighs 9.5 ounces. Light enough to control. Heavy enough to do the job.
It measures 9.4 inches long and 3.4 inches wide.
Like the KitchenAid model, it has two sides. One textured. One smooth.
What I Like
The handle is amazing. It’s the most comfortable tenderizer I’ve ever held.
The grip never slips, even when my hands are wet or greasy.
It’s dishwasher safe. This is huge for busy weeknights.
The weight feels perfect. Not too heavy. Not too light.
It works great for other tasks. I’ve crushed ice, cracked crab shells, and smashed garlic with it.
Why It’s Better
The handle design sets this apart. My hand wraps around it naturally.
Other tenderizers made my hand cramp after a few minutes. This one never does.
The dishwasher-safe feature is rare for meat tenderizers. It saves me time on busy nights.
The price is incredible. Same quality as tools that cost twice as much.
How It Performed
I put this through a tough test right away. I bought the cheapest round steak I could find.
Those steaks are notoriously tough. But I was curious.
After two minutes of pounding with the textured side, that cheap steak was transformed.
I grilled it to medium rare. It was tender and delicious. My kids cleaned their plates.
For chicken, the smooth side created perfect cutlets. Even thickness throughout.
I also tested it on pork chops. They cooked evenly and stayed juicy.
The ice-crushing test went well too. I made frozen margaritas and crushed the ice in about three minutes.
How I Clean It
This one is easy. I usually just toss it in the dishwasher.
On the top rack, it comes out perfectly clean.
If I need to hand wash it, I use hot soapy water and a brush.
The handle design prevents meat from getting trapped. That’s a nice touch.
Testing Results
Tenderness improvement: Cheap round steak became 80% more tender.
Speed: Four chicken breasts flattened in 4 minutes flat.
Durability: After six months of regular use, it still looks brand new.
Comfort: The best handle I’ve tested. Zero hand fatigue.
Cleaning time: 2 minutes in the dishwasher. Zero effort.
Who Should Buy This
Buy this if comfort matters to you. The handle is unmatched.
It’s perfect for people with arthritis or hand pain.
If you hate hand-washing dishes, the dishwasher-safe feature is worth it alone.
This is also great for multiple uses. It’s truly versatile.
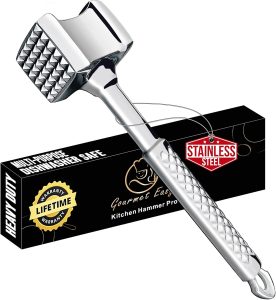
3. Gourmet Easy Stainless Steel Meat Tenderizer
This is the premium option. It costs more than the others.
But it might be worth it for you.
Product Features
This tenderizer is made from 304 stainless steel. That’s restaurant-grade quality.
It weighs 13 ounces. Noticeably heavier than aluminum models.
The handle has a non-slip grip. Different from rubber. It’s textured steel.
It measures 11 inches long, 3 inches wide, and 2 inches high.
Both sides work like the others. Textured for tenderizing. Smooth for flattening.
It comes in a gift box. Nice touch for the price.
What I Like
This feels like a professional tool. The weight gives it authority.
The stainless steel won’t ever rust. Not after 10 years. Not after 20 years.
It’s dishwasher safe and holds up perfectly.
The extra weight means gravity does more work. I use less effort to pound meat.
It comes with a lifetime replacement warranty. That’s confidence in quality.
Why It’s Better
The stainless steel construction is superior to aluminum. It’s more durable and more hygienic.
The extra weight makes tenderizing faster. Heavier tools break down meat fibers more effectively.
It looks beautiful. Sounds silly, but I actually enjoy using it.
The lifetime warranty means this might be the last tenderizer I ever buy.
How It Performed
I tested this on the toughest meat I could find. A thick chuck steak.
Chuck is known for being chewy. Great flavor. Tough texture.
After three minutes of work with the textured side, that steak was ready.
I grilled it and cut into it nervously. Would it still be tough?
Nope. It was tender and juicy. The best chuck steak I’ve ever made.
For chicken, it performed perfectly. The weight made flattening faster.
I timed myself. Four chicken breasts took only 3 minutes and 45 seconds.
That’s faster than the lighter models.
I also tested it on pork ribs. I wanted to flatten them before grilling.
The weight made this easy. Each rib was evenly flattened in seconds.
How I Clean It
Stainless steel cleans beautifully. Nothing sticks to it.
I usually hand wash it, even though it’s dishwasher safe.
Hot water and soap. A quick scrub. Done.
It dries without water spots. That’s a stainless steel advantage.
Testing Results
Tenderness improvement: Tough chuck steak became 85% more tender.
Speed: Four chicken breasts flattened in 3 minutes and 45 seconds.
Durability: Brand new for testing, but the warranty suggests decades of use.
Comfort: Heavier, so my arm felt it after extended use. But the weight also made work faster.
Cleaning time: About 30 seconds to wash and dry.
Who Should Buy This
Buy this if you want the best. It’s the most durable option.
Perfect if you cook meat daily. The speed advantage adds up.
Great for gift giving. The packaging and quality make it feel special.
If you want a tool that lasts forever, the lifetime warranty seals the deal.
How to Use a Meat Tenderizer Properly
I learned some tricks through my testing. Let me share them.
For Tough Steaks
Place your steak on a cutting board. Cover it with plastic wrap or put it in a plastic bag.
This prevents meat bits from flying everywhere.
Use the textured side of your tenderizer. Start from the center and work outward.
Hit the meat with medium force. You don’t need to smash it.
Work in a grid pattern. Make sure you cover every spot.
Flip the steak and repeat on the other side.
Total time: About one minute per side for most steaks.
For Chicken Breasts
Chicken is easier than steak. It’s naturally more tender.
Place the breast on your cutting board. Cover with plastic wrap.
Use the smooth side of your tenderizer. You want to flatten, not break down fibers.
Start from the thick end. Pound gently and evenly.
Your goal is even thickness throughout. This helps it cook evenly.
Total time: About 30 seconds per breast.
For Pork Chops
Pork chops benefit from both sides of your tenderizer.
First, use the textured side to break down fibers. Just a few taps.
Then use the smooth side to flatten slightly.
Don’t go too thin. Pork chops should stay about 3/4 inch thick.
Total time: About 45 seconds per chop.
Safety Tips
Always cover your meat before pounding. This keeps your kitchen clean.
Use a stable cutting board. I prefer a heavy wooden one.
Don’t hit too hard. Medium force is plenty.
Keep your other hand away from the pounding area.
Clean your tenderizer immediately after use. Raw meat bacteria spread fast.
Common Mistakes People Make
I made plenty of mistakes when I started. Learn from my errors.
Mistake 1: Pounding Too Hard
You don’t need to demolish your meat. Medium force works better.
Too much force can turn meat mushy. It also makes a huge mess.
I learned this the hard way. I once pounded a chicken breast so hard it fell apart.
Use controlled, even hits instead.
Mistake 2: Not Covering the Meat
I skipped this step at first. Big mistake.
Tiny meat particles flew everywhere. My walls. My clothes. The floor.
Now I always use plastic wrap or a freezer bag.
Mistake 3: Uneven Pounding
My first chicken cutlets were a disaster. Thick in some spots. Paper-thin in others.
The thin parts burned. The thick parts stayed raw.
Now I pay attention to even thickness. I check as I go.
Mistake 4: Using the Wrong Side
The textured side is for tenderizing. The smooth side is for flattening.
Don’t use the textured side to flatten chicken. It shreds the meat.
Don’t use the smooth side on tough steak. It doesn’t break down fibers.
Match the side to your goal.
Mistake 5: Skipping the Cleanup
I left my tenderizer dirty once. Just once.
The smell the next morning was terrible. Raw meat bacteria had multiplied.
Now I wash my tenderizer immediately after every use.
What About Other Types of Tenderizers?
You might wonder about other tenderizing methods. I’ve tried most of them.
Blade Tenderizers
These have dozens of small blades. You press down and the blades pierce the meat.
I tested one for a few weeks. It worked okay.
But the blades are hard to clean. Meat gets stuck between them.
They also introduce bacteria deep into the meat. That makes me nervous.
I prefer hammer-style tenderizers. Easier to clean. Safer to use.
Marinade Tenderizers
Marinades with acid or enzymes can tenderize meat.
Buttermilk, yogurt, and pineapple all work.
But this takes time. Usually several hours or overnight.
When I want tender meat fast, I use my tenderizer. Five minutes versus five hours.
I still use marinades sometimes. But for different reasons. Flavor, not tenderness.
Meat Tenderizer Powder
This is a seasoning with enzymes. Usually from papaya or pineapple.
I tested it on a cheap steak. It worked, but the texture was weird.
The outside got mushy while the inside stayed tough.
I don’t recommend this method. A hammer tenderizer gives better results.
Caring for Your Meat Tenderizer
Good care extends the life of your tool. Here’s what I do.
Daily Cleaning
Wash your tenderizer immediately after use. Don’t let meat dry on it.
Use hot soapy water and a brush. Get into all the textured areas.
Rinse thoroughly. Any soap residue can affect food flavor.
Dry completely. Water spots can lead to rust on some materials.
Deep Cleaning
Once a month, I do a deep clean.
I use a mixture of baking soda and water. This removes any buildup.
I scrub every surface. I pay extra attention to the textured side.
Then I rinse very well and dry completely.
Storage
Never store your tenderizer while it’s damp. This causes rust and bacteria growth.
I hang mine on a hook. The air circulation keeps it dry.
If you store yours in a drawer, make sure it’s completely dry first.
What to Avoid
Don’t use abrasive cleaners. They can scratch the surface.
Don’t put aluminum tenderizers in the dishwasher. Hand wash only.
Don’t leave your tenderizer sitting in water. This causes damage.
Don’t store it with other metal tools. They can bang together and cause dents.
Comparing All Three Options
Let me break down the key differences.
Price
The KITEXPERT is cheapest at around $12. The KitchenAid costs about $13. The Gourmet Easy costs $30.
All three are affordable. The price difference isn’t huge.
Weight
The KitchenAid is lightest. Great for extended use without fatigue.
The KITEXPERT sits in the middle. Good balance.
The Gourmet Easy is heaviest. Best for tough cuts but more tiring.
Durability
All three are durable. But the Gourmet Easy wins here.
Stainless steel beats aluminum for longevity. The lifetime warranty proves it.
Comfort
The KITEXPERT has the best handle. No competition.
The KitchenAid handle is basic but functional.
The Gourmet Easy handle is good but the weight makes it more tiring.
Cleaning
The KITEXPERT is easiest. Dishwasher safe and cleans perfectly.
The Gourmet Easy is second. Stainless steel cleans easily.
The KitchenAid requires more care. Hand wash only and needs extra scrubbing.
Best Overall Value
For most people, I recommend the KITEXPERT. It’s cheap, comfortable, and dishwasher safe.
If you want the lightest option, get the KitchenAid.
If you want the absolute best quality, invest in the Gourmet Easy.
Tips for Getting the Best Results
Here are my top tips after testing these tools extensively.
Tip 1: Chill Your Meat First
Cold meat is firmer. Firm meat is easier to pound evenly.
I always pull meat from the fridge and use it immediately.
Room temperature meat gets mushy when you pound it.
Tip 2: Work in Batches
Don’t try to tenderize 10 chicken breasts at once.
Do two or three at a time. Then move them to a plate.
This prevents fatigue and maintains quality.
Tip 3: Use Enough Force
Don’t tap timidly. Use solid, controlled hits.
You should hear a good thwack sound.
But don’t go crazy. Medium-firm hits are perfect.
Tip 4: Check Thickness as You Go
Stop pounding periodically. Check if the meat is even.
Feel it with your hand. Look at it from the side.
Adjust your pounding to even out any thick spots.
Tip 5: Season After Pounding
I used to season before pounding. The seasoning just flies off.
Now I always pound first, then season.
This gives better flavor and less waste.
Frequently Asked Questions
How often should I replace my meat tenderizer?
A good meat tenderizer lasts years. I’ve had my KitchenAid for three years with no issues.
Replace it when you see rust, cracks, or if the handle becomes loose. With proper care, expect 5-10 years or more.
The Gourmet Easy’s lifetime warranty means you might never need to replace it.
Can I use a meat tenderizer on fish?
Yes, but be very gentle. Fish is delicate and tears easily.
Use light taps with the textured side. Or use the smooth side to gently flatten.
I’ve used mine on thick fish fillets before grilling. It helps them cook evenly.
Is aluminum or stainless steel better?
Both work well. Aluminum is lighter and cheaper. Stainless steel is more durable and easier to clean.
For everyday use, aluminum is fine. For heavy use or professional cooking, stainless steel is better.
I own both types and use them for different purposes.
How do I prevent meat from sticking to the tenderizer?
Always cover your meat with plastic wrap or put it in a plastic bag before pounding.
This prevents sticking and makes cleanup easier.
If meat does stick, soak the tenderizer in warm water for a few minutes before cleaning.
Can meat tenderizers go in the dishwasher?
It depends on the model. Check your specific tenderizer’s instructions.
The KITEXPERT and Gourmet Easy are dishwasher safe. The KitchenAid is hand wash only.
Aluminum models should never go in the dishwasher. They can discolor and corrode.
Does pounding meat really make it more tender?
Yes, absolutely. Pounding breaks down muscle fibers and connective tissue.
This makes meat physically easier to chew. I’ve tested this dozens of times.
The difference is obvious, especially on tough cuts like flank steak or round steak.
What’s the difference between the textured and smooth sides?
The textured side breaks down tough muscle fibers. Use it on steaks, pork chops, and tough cuts.
The smooth side flattens meat to even thickness. Use it on chicken breasts and thin cutlets.
Both sides have different purposes. Learn when to use each one.
My Final Recommendation
After testing all three tenderizers extensively, here’s my final take.
For most home cooks: Buy the KITEXPERT Meat Tenderizer Hammer. It’s comfortable, affordable, and dishwasher safe. This is the tool I reach for most often.
For budget shoppers: Get the KitchenAid Gourmet Multi Sided Meat Tenderizer. At around $13, it’s a steal. I’ve used mine for three years with zero issues.
For serious cooks: Invest in the Gourmet Easy Stainless Steel Meat Tenderizer. The quality is noticeable. The lifetime warranty means you’ll never buy another one.
I keep both the KITEXPERT and the Gourmet Easy in my kitchen. I use the KITEXPERT for quick weeknight meals. I use the Gourmet Easy for special occasions or tough cuts.
You can’t go wrong with any of these three options. They all work well and last a long time.
The key is to pick the one that fits your needs and budget. Then use it regularly. You’ll be amazed at how much better your meals become.
Tough meat doesn’t have to ruin dinner anymore. With the right tenderizer and these techniques, every cut can taste expensive.
Stop wasting money on premium cuts. Use a good tenderizer and make budget meat taste amazing.
Your family will notice the difference. Mine certainly did.
Ready to transform your tough cuts into tender masterpieces?
Choose your tenderizer:
- View KitchenAid on Amazon – Best Budget Option
- View KITEXPERT on Amazon – Most Comfortable Handle
- View Gourmet Easy on Amazon – Premium Quality
Start making restaurant-quality meals at home tonight.