Last Updated on April 4, 2026 by Susanna Zuyeva
Nothing makes grilled food look more appetizing than clean, dark grill marks.
Those crosshatch lines on a steak or chicken breast signal proper cooking technique. They look professional. They taste great. And they prove the food was cooked on a real hot surface.
The problem is that many electric grill users struggle to get proper grill marks. The food comes off pale and flat. The lines are faint or uneven. It looks nothing like what you would get from a gas grill or cast iron surface.
I have been cooking on electric grills for years. I have made every mistake possible with grill marks. I have also figured out exactly what works. On my smokeless grill, Hamilton Beach grill, and other models I have used, I now get clean, dark steak grill lines and perfect grill marks on chicken consistently.
In this guide I will show you exactly how to do it.
Let us get into it.
Why Grill Marks Form in the First Place
Understanding why grill marks form helps you create them deliberately and consistently.
Grill marks are the result of the Maillard reaction. This is the chemical process between heat, amino acids, and natural sugars in food. When the surface temperature of food rises rapidly to between 150°C and 180°C or above, these compounds react and produce hundreds of new flavor and color compounds.
The dark lines you see are areas of intense localized heat. The raised ridges of the grill grate make direct contact with the food surface. Those contact points reach high enough heat to trigger the Maillard reaction instantly. The areas between the ridges receive radiant heat only and do not get hot enough for the same reaction.
This means grill marks are fundamentally a heat and contact issue. To get great marks you need:
- High enough grill temperature
- Clean, properly shaped ridges on the grate
- Dry food surface that can contact the grate directly
- Enough time to let the reaction complete before moving the food
Every technique I will share comes back to these four principles.
The Most Common Reasons Electric Grills Fail to Produce Grill Marks
Before we get into the solutions, here is what causes the problem in the first place.
The grill was not hot enough. This is the single biggest cause. An electric grill that has not been fully preheated simply does not reach the surface temperature needed for the Maillard reaction to occur quickly. You get steam and pale food instead of sear and color.
The food surface was wet. Moisture on the surface of meat turns to steam when it hits the grill. Steam keeps the food surface below searing temperature. The food cooks but does not brown properly. No browning means no grill marks.
The food was moved too soon. Many people flip food before the grill marks have formed. The food is still bonded to the grate. It tears and takes the forming marks with it. Properly browned food releases naturally from a hot grate. If it is sticking, it is not ready to flip.
The grate was dirty. Old grease residue on a grate acts as insulation. It reduces the contact heat between the ridge and the food surface. Clean grates transfer heat directly and produce cleaner, sharper marks.
The grate ridges were too low. Not all electric grill grates are equal. Shallow ridges make less defined contact with food. Deep, well-spaced ridges produce the clearest marks. This is partly a function of the grill you choose.
Step-by-Step Guide to Perfect Grill Marks
Follow these steps in order every time and you will get consistent, professional-looking results.
Step 1 – Start With a Clean Grate
Clean grates are the foundation of great grill marks.
Old grease and food residue on the grate surface act as a barrier between the metal and your food. They reduce direct heat contact and produce uneven marks at best. At worst, they cause sticking that pulls the forming mark right off the food surface.
Before every cooking session, brush the grate with a grill brush while it is still cold. Any stuck residue from the last cook should come off easily. If it does not, heat the grill for three minutes on high then brush again while warm.
After every cook, do the same. Clean while warm so grease does not harden. This habit keeps grates in perfect condition for sharp, consistent grill marks every time.
Step 2 – Preheat Fully and Aggressively
Turn your electric grill to the highest setting. Set a timer for twelve to fifteen minutes. Do not touch it. Do not add food. Just let it heat.
I preheat my smokeless grill for a full fifteen minutes when I want the best steak grill lines. That extra time beyond the standard recommendation saturates the ridges with heat completely. The difference in mark quality between ten and fifteen minutes of preheating is visible every time.
On a Hamilton Beach searing grill or similar models with a dedicated sear setting, use it. These settings push the heating element to maximum output and are specifically designed for this type of high-heat contact cooking.
If you have a Ninja Sizzle or similar contact grill with a temperature probe, wait until the display shows maximum heat before adding food.
Step 3 – Dry the Food Completely
Take your steak, chicken breast, or other protein and pat it completely dry with paper towels.
Every single drop of surface moisture needs to come off. Moisture is the enemy of grill marks. It creates steam. Steam prevents searing. No sear means no marks.
Pat the surface dry. Then press a fresh paper towel firmly against the surface and hold for three seconds. Pat again. The drier the surface, the faster and more aggressively the Maillard reaction starts when the food hits the hot grate.
For chicken breast, this step is especially important. Chicken holds more surface moisture than beef. Thorough drying is what separates a pale steamed-looking chicken breast from one with clean, dark perfect grill marks.
Step 4 – Oil the Food, Not the Grate
Apply a thin layer of high smoke point oil directly to the food surface. Not to the grate.
Good choices include:
- Avocado oil
- Refined vegetable oil
- Refined coconut oil
- Light olive oil
Avoid extra virgin olive oil for this step. Its smoke point is too low. It burns before searing temperature is reached and produces smoke without proper browning.
A thin layer of oil on the food surface promotes direct heat transfer, encourages browning, and helps the food release cleanly from the grate when grill marks are fully formed.
Applying oil to the grate instead of the food burns off quickly and creates smoke without helping the food surface.
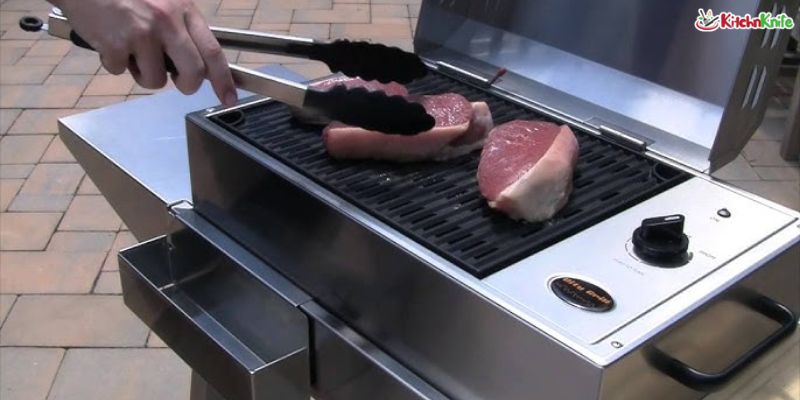
Step 5 – Place Food at a 45-Degree Angle to the Ridges
This is the technique most people miss.
The ridges on your grill grate run in one direction. If you place your steak parallel to the ridges, the marks run along the same axis as the food. They look weak and are hard to see.
Place your food at a 45-degree angle across the ridges. The ridges now cut diagonally across the food surface. This creates the classic diagonal grill mark pattern that looks professional and is more visible.
For crosshatch marks, rotate the food 90 degrees after the first set of marks forms. This creates the diamond grid pattern you see on restaurant steak and grilled chicken breast.
Step 6 – Press Gently and Leave It Alone
When food first touches the hot grate, press it gently but firmly with a spatula or your tongs for three to five seconds. This ensures maximum contact between the food surface and the hot ridges.
Then leave it completely alone.
Do not nudge it. Do not check underneath it. Do not move it at all.
Properly formed grill marks take time. On a steak at maximum heat this means two to three minutes per side. On a chicken breast it means four to five minutes per side at medium-high heat.
The food will tell you when it is ready. When grill marks have fully formed, the food releases naturally from the grate. If you try to lift it and it sticks or resists, it is not ready. Give it thirty more seconds and try again.
Step 7 – Flip Once for Single Marks, Twice for Crosshatch
For single diagonal marks: Flip the food once after the first set of marks forms. You now have marks on one side. The second side cooks without rotating.
For crosshatch diamond marks: After the first two to three minutes, rotate the food 90 degrees in the same face-down position. Do not flip yet. Cook for another two minutes. Then flip. You will have a perfect crosshatch pattern on the first side.
After flipping, you can create crosshatch on the second side too using the same rotation technique.
This is exactly how restaurant grills produce those perfect diamond patterns on steak and chicken.
The Right Grill for Great Marks
The grill you use matters significantly. Not all electric grills are designed for grill marks.
Searing grills are the best option. A searing grill has deep, heavy ridges specifically designed for high-contact searing. Hamilton Beach makes well-regarded searing grill models that produce excellent marks at an accessible price point.
Smokeless grill models with raised ridges also work well. Look for models with deep, clearly defined ridge profiles rather than shallow pressed lines.
Contact grills like clamshell designs are not ideal for traditional grill marks. The pressure from the top plate affects the mark formation. They produce consistent marks but not the dramatic single-face crosshatch pattern you get from an open grate grill.
Grill pan alternatives If your electric grill is not producing the marks you want, a cast iron grill pan heated on an electric hob is an excellent alternative. Cast iron holds heat extremely well. It produces some of the best grill marks of any surface available. A cast iron grill pan preheated for five minutes on high heat produces professional-quality steak grill lines and is worth keeping in your kitchen alongside your electric grill.
Special Techniques for Specific Foods
Steak Grill Lines
For the best steak grill lines:
- Bring the steak to room temperature before cooking
- Pat completely dry
- Season with salt at least forty minutes before cooking or right before grilling
- Never season with salt fifteen to thirty minutes before it draws moisture to the surface at exactly the wrong time
- Preheat grill to maximum for fifteen minutes
- Place at 45 degrees and press firmly
- Two to three minutes per side at maximum heat for medium-rare one-inch steak
Chicken Breast
For perfect grill marks on chicken:
- Pound to even thickness this is critical for even contact across the whole surface
- Pat completely dry
- Thin layer of avocado oil all over
- Medium-high heat around 230°C
- Four to five minutes per side without moving
- Use a meat thermometer to confirm 74°C internal temperature
Vegetables
Vegetables produce grill marks easily because their flat surfaces make excellent contact with grate ridges.
- Slice zucchini, eggplant, and bell peppers into flat pieces
- Toss with olive oil and season
- Medium heat around 210°C
- Three to four minutes per side
- Rotate 90 degrees after two minutes for crosshatch if desired
Troubleshooting: Why Your Marks Still Are Not Working
Marks are very faint: Grill not hot enough. Preheat longer. Use maximum heat setting.
Food is sticking and tearing: Food moved too soon. Wait until the food releases naturally. Do not force it.
Marks are uneven: Food surface is wet. Pat drier. Or grate ridges have grease buildup. Clean more thoroughly.
One side marks fine, other side does not: Grill has hot spots. Rotate food during cooking to compensate.
Contact grill marks are too light: Increase preheat time and press down firmly with the top plate immediately after closing.