Last Updated on February 23, 2026 by Erin Jahan Eva
How to Use a Bread Knife Without Squashing
You bake a beautiful loaf. Then you cut it and the whole thing squashes flat.
It is one of the most frustrating things in the kitchen. But it is also one of the most common. And the fix is simple.
The problem is almost never the bread. It is the technique. Sometimes it is the wrong knife. Most of the time, it is both.
When you learn how to use a bread knife correctly, everything changes. You get clean, even slices. The crust stays crisp. The inside stays soft and airy. No more flat, torn loaves.
This guide covers everything you need. You will learn how to pick the right knife, how to hold it, and how to cut bread without squashing it. You will also learn how to keep your knife in great shape for years.
What Makes a Bread Knife Different From Other Kitchen Knives
Not all kitchen knives are the same. A bread knife has a very specific design. That design exists for one reason: to cut through bread without destroying it.
The key feature is the serrated edge.
A serrated knife has small, pointed teeth along the blade. These teeth grip the crust and saw through it gently. They do not push down. They cut sideways.
A regular chef knife or cutting knife has a straight edge. When you press it into bread, it pushes the loaf down before it cuts through. That is what causes squashing.
Serrated knives work differently. They glide through the hard outer crust. They slice through the soft interior without compressing it.
Other features to look for in a bread knife:
- A long blade — at least 8 to 10 inches works best for most loaves
- Stainless steel construction — it resists rust and holds its edge well
- A comfortable, non-slip handle
- Deep, evenly spaced serrations
A good serrated bread knife is one of the most useful tools in your kitchen. It does one job and it does it very well.
Choosing the Right Serrated Bread Knife
The market is full of options. Some knives are excellent. Some look good but fail quickly.
Here are the key things to look for.
Blade length A longer blade means fewer strokes per slice. Fewer strokes means less pressure. Less pressure means no squashing. Look for a blade that is at least 9 to 10 inches long.
Serration style Some serrated knives have pointed teeth. Others have rounded scallops. Both work. Pointed teeth grip crusty bread better. Rounded scallops glide more smoothly through soft loaves.
Stainless steel blade Stainless steel is durable, easy to clean, and resists corrosion. It holds a sharp edge longer than cheaper metals. Most quality bread knives use high-carbon stainless steel for this reason.
High-quality brands If you want a professional-grade knife, consider the Shun Premier. The Shun Premier is a Japanese-made knife with a hand-hammered blade finish and a comfortable PakkaWood handle. It slices through bread with almost no effort. It is built to last decades with proper care.
Another trusted name in the kitchen knife world is Kai Shun. Kai Shun produces a full range of serrated knives that combine Japanese craftsmanship with everyday practicality. Their bread knives are well-balanced, sharp, and beautifully made.
You do not need to spend a fortune. But investing in a quality serrated bread knife makes a real difference.
How to Hold a Bread Knife the Right Way
Your grip matters more than you might think. A poor grip leads to uneven pressure. Uneven pressure leads to squashing.
The correct grip:
Hold the handle firmly with your dominant hand. Wrap all four fingers around the handle. Place your thumb on the side of the handle for control. Do not grip the blade itself.
Your hand should feel relaxed but steady. A tight, tense grip causes you to press down harder than you need to. That extra pressure is exactly what squashes the bread.
Guiding the loaf:
Use your non-dominant hand to hold the loaf steady. Keep your fingers curled inward, like a claw. This protects your fingers and gives you better control over the loaf.
Do not press down on the top of the bread with your guiding hand. You want to hold it from the side. Let the knife do the cutting. Your free hand just keeps the loaf from sliding.
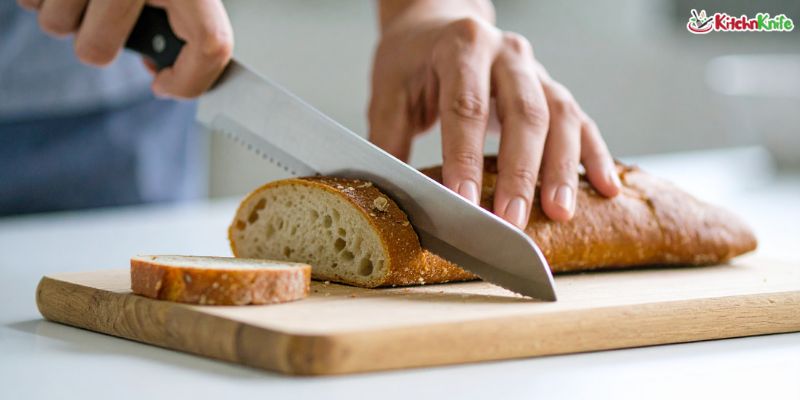
Step-by-Step: How to Cut Bread Without Squashing
Follow these steps every time you cut bread. Each step has a purpose. Skip one and you risk squashing the loaf.
Step 1: Let the bread cool completely
Warm bread is soft inside. The steam has not fully escaped yet. If you cut it too soon, the inside compresses easily and the texture turns gummy. Wait at least 30 to 45 minutes after baking before you cut bread.
Step 2: Place the bread on a stable surface
Use a cutting board that does not slide. A wooden or plastic board with rubber feet works well. A stable surface gives you full control over each stroke.
Step 3: Position the knife correctly
Place the serrated blade against the crust at the top of the loaf. Do not press down yet. Let the blade rest on the surface of the bread with almost no pressure.
Step 4: Start with a light scoring stroke
Pull the knife back gently toward you. This first stroke just breaks through the outer crust. It creates a small groove for the blade to follow. This is the key step most people skip.
Step 5: Use a slow, steady sawing motion
Move the knife forward and back in a long, smooth stroke. Let the serrated teeth do the work. Do not push down. The blade should glide through the bread naturally.
Use the full length of the blade. Short, choppy strokes cause tearing and uneven cuts.
Step 6: Apply zero downward pressure
This is the most important rule. Downward pressure squashes bread. The serrated blade does not need it. Trust the teeth. They cut on both the forward and backward stroke.
Step 7: Finish the cut cleanly
As you reach the bottom of the loaf, slow down. Let the blade come through to the cutting board without forcing it. Lift the slice away gently.
The Best Cutting Technique for Different Bread Types
Different breads need slightly different approaches.
Crusty sourdough or baguette These have a hard, crackly crust. Start with a firmer scoring stroke to break through the outer shell. Once you are through the crust, ease up and let the knife glide.
Soft sandwich bread This is the most likely to squash. Use the lightest possible touch. Keep strokes long and even. A very sharp serrated knife is essential here.
Dense whole grain loaves These are firm and heavy. They hold their shape better. Use steady, slow strokes. You may need to apply slightly more forward motion to get through the thick crumb.
Artisan loaves with thick crusts Score the top first to get a clean entry point. Then use a smooth sawing motion. Keep your guiding hand firmly on the side of the loaf to prevent any wobbling.
Pastries and delicate baked goods A serrated knife also works well on pastries. Use a feather-light touch. Let the teeth do all the work. No pressure at all.
How to Maintain and Care for Your Serrated Knife
A dull bread knife causes more damage than a sharp one. When the teeth lose their edge, you press harder. And pressing harder squashes bread.
Knife sharpening for serrated blades
Knife sharpening for serrated knives is different from sharpening straight blades. You cannot use a standard whetstone on serrated knives. Each tooth must be sharpened individually.
Use a tapered ceramic rod or a serrated knife sharpening tool. Work each serration one at a time. Hold the rod at the angle of the bevel. Stroke it along each tooth two or three times.
This process takes patience. But it is worth it. A sharp serrated bread knife cuts cleanly and effortlessly.
If sharpening feels too complex, take your knife to a professional. Many kitchen shops and knife specialists offer sharpening services for serrated knives.
Daily care tips:
- Wash your bread knife by hand. Do not put it in the dishwasher. The heat and chemicals weaken the blade and handle over time.
- Dry the knife immediately after washing. Never leave stainless steel sitting in water.
- Store the knife in a knife block, on a magnetic strip, or in a blade guard. Do not throw it loose in a drawer where the teeth can get damaged.
- Never use your serrated bread knife on hard surfaces like stone or glass. Always use a proper cutting board.
Common Mistakes That Squash Bread
Knowing what not to do is just as important as knowing what to do.
Using the wrong knife A chef knife or a regular cutting knife is not designed to cut bread. Even a sharp chef knife pushes down on the loaf before it cuts through. Always use a serrated knife for bread.
Cutting warm bread Warm bread is fragile. The crumb structure has not fully set. Cutting too early always leads to squashing and a gummy texture inside.
Using short, choppy strokes Short strokes mean more pressure in a smaller area. This tears the bread and squashes it. Use long, smooth strokes instead.
Pressing down too hard This is the number one cause of squashed bread. Serrated knives do not need downward force. If you are pressing hard, your knife is probably dull.
Using a dull blade A dull serrated knife drags and tears instead of cutting. It forces you to apply more pressure. Keep your blade sharp through regular knife sharpening.
Not stabilizing the loaf If the bread moves while you cut it, your strokes become uneven. You compensate by pressing harder. Always hold the loaf firmly from the side.
FAQs
Q: Why does my bread always squash when I cut it? The most common reasons are using the wrong knife, cutting warm bread, or pressing down too hard. Use a sharp serrated bread knife, wait for the bread to cool, and let the blade do the work without applying downward pressure.
Q: Can I use a chef knife to cut bread? You can, but it is not ideal. A chef knife does not have serrations. It pushes down on the loaf before cutting through it. This causes squashing, especially with soft bread. A dedicated serrated knife is always the better choice.
Q: How do I sharpen a serrated knife at home? Use a tapered ceramic rod. Work each serration individually. Hold the rod at the angle of the bevel and stroke two to three times per tooth. Knife sharpening for serrated blades takes more time than for straight knives, but it restores the edge well.
Q: Is the Shun Premier worth the price? Yes, for serious home cooks. The Shun Premier is a high-quality kitchen knife with exceptional balance and sharpness. It holds its edge well and makes bread cutting noticeably easier. Kai Shun products are built to last with proper care.
Q: What is the best bread knife for home use? Look for a serrated bread knife with a blade of at least 9 inches, made from stainless steel, with a comfortable handle. Brands like Kai Shun and Shun Premier offer some of the best options on the market.
Q: Do all serrated knives work for bread? Not equally. Knives designed specifically as bread cutters have the right blade length and tooth spacing for the job. Smaller serrated knives may work on soft bread but struggle with thick crusts.
Conclusion
Squashed bread is a solvable problem. You just need the right knife and the right technique.
Always use a serrated bread knife. Let the bread cool before you cut it. Use long, smooth strokes. Never press down.
Keep your knife sharp through regular knife sharpening. Store it properly. Clean it by hand.
Once you get the technique right, cutting bread becomes easy and satisfying. You will get clean slices every time. The crust will stay intact. The inside will stay soft and airy.
A good serrated knife, like the Shun Premier or a Kai Shun model, makes the whole process even better. These are tools that last a lifetime when you take care of them.
Treat your bread with respect. Use the right tool. And let the knife do the work.