Last Updated on November 18, 2025 by Kathay Lee
Complete Guide to Slicing Meat Against the Grain
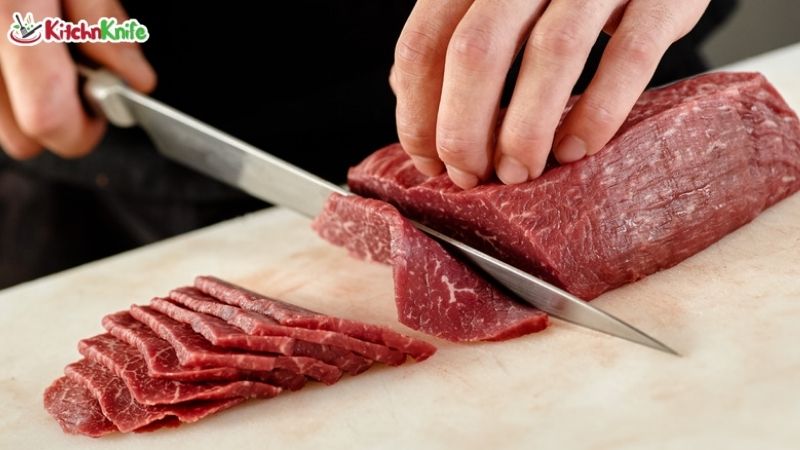
What Does “Against the Grain” Mean?
The grain in meat refers to the direction of muscle fibers. These fibers run in parallel lines through the meat. When you look at a piece of raw or cooked meat, you can see these lines clearly.
Slicing against the grain means cutting perpendicular to these fibers. You cut across them, not along them. This makes a huge difference in how tender your meat tastes.
Think of it like cutting a rope. If you cut along the rope’s length, it stays strong. But if you cut across it, the rope falls apart easily. Meat works the same way.
Why Slicing Against the Grain Matters
Cutting meat the right way changes everything. Here’s why it’s so important:
Makes Meat More Tender
When you slice against the grain, you shorten the muscle fibers. Short fibers are easier to chew. Your teeth don’t have to work as hard to break them down.
Improves Texture
Meat sliced with the grain feels stringy and tough. It can be hard to chew, even if cooked perfectly. Cutting against the grain gives you a better bite every time.
Works for All Cuts
This technique helps tough cuts and tender cuts alike. A flank steak becomes incredibly tender. Even a ribeye steak tastes better when sliced correctly.
How to Find the Grain Direction
Finding the grain is easy once you know what to look for. Here’s how to spot it:
Look for Parallel Lines
Raw meat shows the grain clearly. You’ll see long lines running in one direction. These are the muscle fibers.
Check Cooked Meat
The grain is still visible after cooking. The lines may be less obvious, but they’re there. Look closely at the surface.
Use Your Fingers
Run your finger across the meat. You can feel the ridges of the muscle fibers. This helps confirm the grain direction.
Step-by-Step: How to Slice Against the Grain
Follow these simple steps for perfect slices every time:
Step 1: Let Meat Rest
After cooking, let your meat rest for 5-10 minutes. This makes it easier to cut and keeps the juices inside.
Step 2: Identify the Grain
Look at your meat. Find the direction of the muscle fibers. They usually run lengthwise along the cut.
Step 3: Position Your Knife
Hold your knife perpendicular to the grain lines. The blade should form a 90-degree angle with the fibers.
Step 4: Slice Thin
Cut slices about 1/4 inch thick. Thinner slices are more tender. Use a sharp knife for clean cuts.
Step 5: Cut on a Bias (Optional)
For an even more tender result, angle your knife at 45 degrees. This creates longer slices that are easier to chew. This technique works great for stir fry dishes.
Slicing Different Types of Meat
Different cuts require slightly different approaches. Here’s what you need to know:
Flank Steak
Flank steak has very visible grain lines. The fibers run lengthwise along the cut. Always slice thin and perpendicular to these lines. This cut benefits most from proper slicing technique.
Strip Steak
Strip steak has a more subtle grain pattern. Look closely to find the fiber direction. Cut across these fibers for tender bites.
Ribeye Steak
Ribeye steak contains more fat, which makes it naturally tender. But slicing against the grain still improves the texture. The grain can curve, so pay attention as you cut.
Sirloin Steak
Sirloin steak has a clear grain pattern. The fibers usually run in one consistent direction. Cut perpendicular to these lines for best results.
Chicken Breast
To cut chicken breast properly, first identify the grain. Chicken fibers are finer than beef, but they’re still visible. Slice across them for tender pieces. This is especially important when you slice chicken for stir fries or salads.
Corned Beef
Corned beef has a very pronounced grain. The long cooking time doesn’t break down the fibers completely. Always slice thin and against the grain. This makes corned beef tender instead of stringy.
Common Mistakes to Avoid
Even experienced cooks make these errors. Here’s what to watch out for:
Slicing While Hot
Hot meat is harder to cut cleanly. It also loses more juice. Always let meat rest first.
Using a Dull Knife
A dull knife tears meat instead of slicing it. This creates ragged edges and tough texture. Keep your knife sharp.
Cutting Too Thick
Thick slices are harder to chew. Even when cut against the grain, they can be tough. Aim for thin, even slices.
Not Checking the Grain
The grain direction isn’t always obvious. Take a moment to look before you cut. This small step makes a big difference.
Slicing in the Wrong Direction
This is the most common mistake. Always double-check that you’re cutting perpendicular to the fibers.
Special Techniques for Tough Cuts
Some cuts need extra attention. Here’s how to handle them:
Double-Check the Grain
Tough cuts like flank steak show the grain very clearly. Use this to your advantage. The lines tell you exactly where to cut.
Slice Extra Thin
For very tough cuts, go thinner than usual. Slices as thin as 1/8 inch work best.
Use a Bias Cut
Angling your knife at 45 degrees creates longer slices. These break up the fibers even more effectively.
Consider Partial Freezing
If meat is hard to slice thin, freeze it for 15-20 minutes first. This firms it up without freezing it solid. It’s easier to get thin, even slices this way.
Tips for Stir Fry Preparation
Stir fry dishes require special slicing techniques. Here’s how to prepare meat for stir frying:
Slice Very Thin
Stir fry meat should be no more than 1/8 inch thick. Thin slices cook quickly and stay tender.
Cut on a Bias
The bias cut creates longer, thinner slices. These are perfect for stir fry because they have more surface area.
Keep Slices Uniform
Even slices cook at the same rate. This prevents some pieces from overcooking while others stay raw.
Prep When Cold
Meat straight from the fridge is easier to slice thin. You can also partially freeze it as mentioned above.
Tools You Need
The right tools make slicing easier and safer. Here’s what helps:
Sharp Chef’s Knife
A sharp 8-inch chef’s knife handles most slicing tasks. Keep it sharp with regular honing.
Slicing Knife
A long, thin slicing knife is ideal for large roasts. The length helps you make smooth, even cuts.
Cutting Board
Use a large, stable cutting board. Wood or plastic both work well. Make sure it doesn’t slip.
Carving Fork
A two-pronged fork holds meat steady while you slice. This keeps your fingers safe.
Visual Guide: Grain Patterns
Understanding how grain looks in different meats helps you slice correctly every time.
Beef Cuts
Most beef cuts have visible, parallel grain lines. Flank steak shows this most clearly. The lines run the length of the cut. Ribeye steak has a more complex pattern because of the marbling.
Chicken
Chicken breast has finer grain lines than beef. They’re still visible if you look closely. The fibers run lengthwise along the breast.
Pork
Pork grain resembles beef but is often finer. Pork chops and tenderloin both have clear grain patterns.
Frequently Asked Questions
What happens if I slice with the grain?
Slicing with the grain leaves long muscle fibers intact. These fibers are tough and stringy. Your meat will be much harder to chew, even if cooked perfectly.
Does the grain direction change in one piece of meat?
Yes, sometimes. Large cuts or oddly-shaped pieces can have grain running in different directions. Check the grain direction as you slice and adjust your angle as needed.
How thin should I slice meat?
For most purposes, aim for 1/4 inch thick. For stir fry or very tough cuts, slice even thinner at 1/8 inch. Thinner is generally more tender.
Can I slice meat against the grain before cooking?
You can, but it’s usually better to slice after cooking. Whole pieces retain moisture better during cooking. However, for stir fry dishes, slicing before cooking is standard.
Does this technique work for all meats?
Yes. All muscle meat has grain. This includes beef, pork, chicken, turkey, lamb, and game meats. The principle applies to all of them.