Last Updated on November 9, 2025 by Kathay Lee
Introduction
I still remember my first time trying to dice an onion. Tears streamed down my face. My fingers felt too close to the blade. The pieces came out uneven. It was a mess.
But here’s good news. Dicing an onion doesn’t have to be scary or slow. With the right method, you can cut onions like a pro. You’ll keep your fingers safe. You’ll save time. And you’ll get perfect pieces every time.
This guide shows you exactly how to do it. I’ll walk you through each step. You’ll learn the technique professional cooks use. And you’ll discover tips that make the job easier and safer.
Let’s get started.
What You Need Before You Start
The Right Knife Makes All the Difference
You need a sharp chef’s knife. A dull knife is actually more dangerous. It slips easily. It requires more pressure. This increases your risk of cuts.
Your knife should be 8 to 10 inches long. The blade should feel balanced in your hand. If your knife wobbles or feels awkward, consider getting a better one.
Keep your knife sharp. A sharp blade cuts cleanly through the onion. It gives you better control. You use less force.
Choose Your Cutting Board Wisely
Pick a stable cutting board. Wood or plastic both work well. The board should be large enough for the onion and your hand movements.
Place a damp towel under your cutting board. This stops it from sliding. A moving board causes accidents.
Make sure your board sits flat on the counter. No wobbling allowed.
Selecting the Best Onion
Different onions work for different recipes. Here’s what you need to know:
Yellow onion: This is your everyday choice. It works in most dishes. The flavor is balanced. Most cooks keep these on hand.
Red onion: These taste milder and slightly sweet. They’re great raw in salads. The color adds beauty to your dish.
White onion: These have a sharp, clean taste. They’re common in Mexican cuisine. Use them in salsas and fresh dishes.
Look for firm onions. The skin should be papery and dry. Avoid soft spots or sprouting. Fresh onions are easier to cut and taste better.
Setting Up Your Workspace
Clear your counter space. You need room to work safely. Remove any clutter.
Position yourself comfortably. Stand with your feet shoulder-width apart. The counter should hit just below your waist. This gives you good leverage and control.
Keep a small bowl nearby for scraps. This keeps your workspace clean as you cook.
Understanding Onion Anatomy
An onion has two important ends. One is the root end. It’s round and has small roots. The other is the stem end. It’s pointed and was connected to the green shoots.
The root end holds the onion together. When you cut, you leave this end intact as long as possible. This keeps the layers connected. It makes dicing safer and easier.
The layers run from root to stem. Understanding this helps you make the right cuts. Your knife should follow these natural lines.
This simple knowledge prevents the onion from falling apart. It keeps your cuts uniform. And it keeps your fingers safer because the onion stays stable.
Step-by-Step: The Professional Dicing Method
Step 1: Prepare the Onion
Place your onion on the cutting board. Use your chef’s knife to cut off the stem end. Make this cut about half an inch from the top.
The root end stays on for now. This is your handle. It keeps the onion stable.
Stand the onion on the flat end you just created. Cut straight down through the root. You now have two halves.
Step 2: Peel Safely
Peel away the papery outer skin. Start at the cut edge. Pull toward the root end. Remove the first layer if it feels slimy or damaged.
Leave the root intact. I can’t stress this enough. The root holds everything together.
Place each half flat-side down on your board. This stable position is key for safe cutting.
Step 3: Make Horizontal Cuts
This step is optional but gives you perfect dice. Hold the onion firmly with your non-cutting hand. Place your palm on top. Keep your fingers away from the blade path.
Turn your knife horizontal. Make two or three cuts parallel to the cutting board. Start near the top. Stop before you reach the root end.
Keep the cuts about a quarter-inch apart. These cuts should not go all the way through. The root end keeps everything connected.
Step 4: Make Vertical Cuts
Now for the key step. Point the knife tip toward the root end. Make vertical cuts following the onion’s natural lines. These lines run from root to stem.
Angle your cuts slightly toward the center. This follows the onion’s natural curve. Your cuts will be more uniform this way.
Space your cuts about a quarter-inch apart. Closer cuts give you a finer chop. Wider cuts create larger pieces.
Keep the root end intact. Your hand stays behind the blade at all times.
Step 5: Dice Across
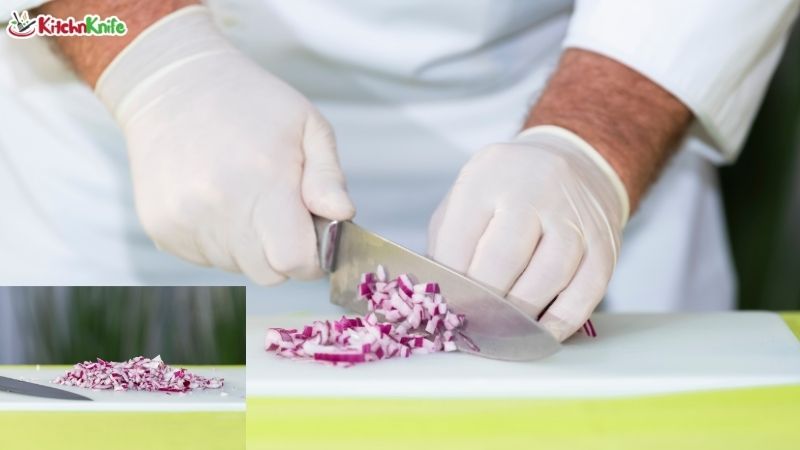
Turn the onion so the root end points away from you. Now make cuts perpendicular to your vertical cuts. Cut across the onion from one side to the other.
Perfect dice pieces fall away as you cut. The root end is the last thing you cut. When you reach it, either dice it carefully or discard it.
Pro Tips for Perfect Results
Keep your knife tip down. Rock the blade as you cut. This gives you better control.
Start slowly. Speed comes with practice. Never rush when you’re learning.
If the onion slips, stop. Reposition it. A stable onion is a safe onion.
Use the knuckle method. Curl your fingers. Let your knuckles guide the blade. This protects your fingertips.
Common Mistakes to Avoid
Don’t cut toward yourself. Always cut away from your body or straight down.
Don’t remove the root too early. It’s your safety handle. Respect it.
Don’t use a dull knife. Sharpen your blade regularly. This is the single most important safety step.
Don’t rush. Speed comes naturally with practice. Focus on technique first.
Knife Skills That Keep You Safe
Proper Grip Technique
Hold the knife handle with three fingers. Your thumb and index finger should pinch the blade where it meets the handle. This is called the pinch grip.
This grip gives you maximum control. Your hand becomes one with the knife. You can make precise cuts with less effort.
Your wrist should stay loose. Let the knife do the work. Tension makes you clumsy and tired.
The “Claw” Hand Position
Your non-cutting hand is just as important as your cutting hand. Make a claw shape with your fingers. Tuck your fingertips under. Let your knuckles face the blade.
The flat of the blade rests against your knuckles. As you cut, slide your claw backward. The knife never rises higher than your knuckles.
This technique feels awkward at first. Practice it anyway. It protects your fingertips completely.
Keeping Your Knife Sharp
A sharp knife is safer than a dull one. This surprises many home cooks. But it’s true.
Sharp blades cut cleanly. They don’t slip. You use less force. This gives you better control.
Sharpen your knife every few months. Use a whetstone or take it to a professional. Between sharpenings, use a honing steel before each use.
Test sharpness carefully. A sharp knife should slice through a tomato skin with no pressure.
Speed vs. Safety Balance
Professional cooks move quickly. But they started slowly. They built muscle memory first. Speed came later.
Focus on safety first. Make each cut deliberately. Think about hand position. Check your stance.
As you practice, you’ll naturally get faster. Your hands will remember the movements. The technique will feel automatic.
Never sacrifice safety for speed. A cut finger sets you back much more than taking an extra minute would.
Building Confidence Gradually
Start with one onion. Focus on the technique. Don’t worry about speed.
Practice on cheaper yellow onions. They’re forgiving. Save expensive ingredients for when you’re confident.
Celebrate small wins. Did you keep the root intact? Great. Were your cuts more even? Excellent. Progress comes in small steps.
With each onion, you’ll feel more comfortable. Your knife skills will improve. Soon, dicing onions will feel natural.
Different Cuts for Different Recipes
How to Finely Chop for Sauces
Some recipes need very small onion pieces. Salsa and marinara sauce are good examples. For these, you want to finely chop your onion.
Follow the same dicing method. But make your cuts closer together. Space them about an eighth of an inch apart.
After dicing, gather the pieces. Run your knife through them again. Use a rocking motion. This breaks them down further.
Finely chopped onion melts into sauces. It distributes flavor evenly. You won’t bite into large chunks.
How to Thinly Slice for Caramelizing
Caramelized onions need thin slices. These cook evenly. They develop that sweet, rich flavor we love.
Cut the onion in half as usual. Leave the root end on. But skip the horizontal cuts.
Make your vertical cuts very close together. About an eighth of an inch works well. Then make your perpendicular cuts.
You’ll get long, thin strips. Perfect for burgers, sandwiches, or any dish where you want that deep onion flavor.
Creating Onion Strips for Fajitas
Mexican dishes often call for onion strips. These are sometimes called julienne cuts.
Cut the onion in half. Remove the root end this time. Peel away the layers.
Lay the layers flat. Cut them lengthwise into strips. Make the strips about a quarter-inch wide.
These onion strips hold their shape during cooking. They add great texture to fajitas, stir-fries, and kebabs.
Rough Chop for Soups and Stews
Some recipes don’t need perfect cuts. Soups and stews are examples. The onion will cook down anyway.
For these dishes, you can rough chop. Cut the onion into quarters. Remove the root. Make a few cuts in each direction.
The pieces will be uneven. That’s okay. They’ll soften and blend into the dish as it cooks.
This method saves time. Use it when precision doesn’t matter.
Matching Cut to Cooking Method
Think about how you’ll cook the onion. This determines your cut style.
Quick cooking methods need smaller pieces. Stir-fries and sautés work best with small dice or thin slices. Small pieces cook faster.
Slow cooking methods can handle larger pieces. Pot roasts and braised dishes give onions time to soften. Larger cuts hold their shape better.
Raw applications need the most precision. Salads and garnishes sit on top of food. Everyone sees them. Make these cuts neat and uniform.
Time-Saving Tips from Professional Cooks
Prep Multiple Onions at Once
If you cook often, dice several onions together. The setup time is the same whether you cut one or five onions.
Get into a rhythm. Your muscle memory kicks in. The second onion goes faster than the first. The third is faster still.
Just make sure your knife stays sharp. A dull blade gets more dangerous as you work. Take a break to hone the blade if needed.
Storage Tips for Pre-Diced Onions
Store diced onions in airtight containers. They’ll keep in the fridge for three to four days.
Press plastic wrap directly on the surface. This reduces oxidation. It keeps the onions fresher longer.
For longer storage, freeze diced onions. Spread them on a baking sheet first. Freeze until solid. Then transfer to a freezer bag.
Frozen onions work great in cooked dishes. They get softer when thawed, so don’t use them raw.
Tools That Actually Help
A food processor can chop onions quickly. But it often gives uneven results. The pieces can get mushy. And cleanup takes time.
For most home cooks, a good knife works better. You get more control. The results look better. And there’s less cleanup.
One tool worth considering is an onion holder. It’s a small device with prongs. You stick the prongs into the onion. The holder keeps your fingers away from the blade.
Culinary Shortcuts That Don’t Sacrifice Quality
Learn to dice faster by practicing regularly. Set aside time once a week. Dice a few onions for meal prep.
Keep your workspace organized. Have everything in place before you start. Clean as you go. This saves time in the long run.
Watch professional cooks online. They often share helpful tips. But remember, they’ve practiced for years. Don’t expect to match their speed right away.
Dealing with Onion Tears
Why Onions Make You Cry
Onions contain sulfur compounds. When you cut an onion, these compounds release into the air. They mix with the moisture in your eyes. This creates a mild acid.
Your eyes try to wash away this irritant. They produce tears. It’s a natural defense mechanism.
Some onions are worse than others. Fresh onions tend to be stronger. The sharper your knife, the less cell damage you cause. This means fewer tears.
Science-Backed Prevention Methods
Chill your onion in the fridge for 30 minutes before cutting. Cold slows down the release of those tear-causing compounds.
Use a sharp knife. Clean cuts rupture fewer cells. This releases less of the irritating gas.
Cut near a vent or fan. Moving air carries the compounds away from your face. An open window works too.
Light a candle near your cutting board. The flame burns some of the sulfur compounds before they reach your eyes.
Quick Fixes That Work
If tears start flowing, step away for a moment. Splash cold water on your face. This washes away the irritant.
Some cooks wear swimming goggles. It looks silly but works perfectly. The seal protects your eyes completely.
Breathe through your mouth instead of your nose. This changes how the compounds enter your system. It can reduce tearing.
Don’t rub your eyes with onion-covered hands. This makes things worse. Wash your hands first.
Safety Checklist
Before You Start
- Is your knife sharp? Test it safely.
- Is your cutting board stable? Use a damp towel underneath if needed.
- Do you have enough counter space? Clear away clutter.
- Are you wearing appropriate clothing? No loose sleeves near the blade.
- Is your workspace well-lit? You need to see what you’re doing.
During Cutting
- Are you using the claw grip? Protect those fingertips.
- Is the root end still intact? Don’t cut it until the end.
- Are you cutting away from your body? Never toward yourself.
- Is your attention focused? Don’t cut while distracted.
- Are you feeling rushed? Slow down if needed.
After You Finish
- Clean your knife immediately. Dried onion juice is sticky.
- Wash your hands thoroughly. Use soap and cold water.
- Store your knife safely. Use a knife block or magnetic strip.
- Wipe down your cutting board. Use hot, soapy water.
- Put away any remaining onions. Store them in a cool, dry place.
When to Replace Your Knife
A knife that won’t hold an edge needs replacing. If you sharpen it and it dulls immediately, it’s time for a new one.
Check for chips or cracks in the blade. These are safety hazards. A damaged knife is dangerous.
If the handle is loose or cracked, replace the knife. You need a secure grip for safe cutting.