Last Updated on December 6, 2025 by Kathay Lee
The Complete Guide to Carving Turkey Like a Pro
Why Learning to Carve Turkey Matters
Carving a turkey feels scary for many home cooks. You spent hours cooking the perfect bird. Now you must slice it without making a mess. Good news: carving turkey is easier than you think.
When you carve turkey the right way, every guest gets tender, juicy meat. You avoid torn skin and wasted portions. Plus, you look like a pro at the dinner table.
This guide teaches you simple steps to carve turkey like an expert. You’ll learn the best tools, cutting techniques, and presentation tips. By the end, you’ll feel confident handling any roast turkey.
Let’s start with the basics and work our way to advanced tricks.
Getting Your Tools and Space Ready
Before you carve turkey, gather these items:
- Sharp carving knife (8 to 10 inches long)
- Cutting board with juice grooves
- Kitchen towel or paper towels
- Large serving platter
- Carving fork (optional but helpful)
A sharp knife makes all the difference. Dull blades tear the meat and make carving harder. Test your knife on a piece of paper. It should slice cleanly.
Set up your cutting board near the roasting pan. This saves time and keeps your workspace clean. Put a damp towel under the board to stop it from sliding.
Let Your Turkey Rest First
Never carve turkey right out of the oven. The meat needs time to relax. This keeps the juices inside instead of spilling on your board.
Rest your turkey for 20 to 30 minutes after roasting. Cover it loosely with foil. The turkey stays warm while the juices settle back into the meat.
A rested turkey is easier to carve. The meat holds together better and tastes more moist.
Know Your Turkey’s Body Parts
Understanding turkey anatomy helps you carve faster. Here are the main sections:
Turkey Legs: These include two parts. The drumstick is the lower leg. The thigh connects to the body.
Breast Meat: This is the large section on top. It provides the most slices.
Wings: Small sections on each side. They have less meat but taste great.
The Wishbone: This Y-shaped bone sits at the neck end. Removing it early makes breast carving easier.
Each part of the turkey cooks at different rates. Dark meat in the turkey legs stays moist longer. White breast meat dries out faster if overcooked.
When you understand these parts, you know where to cut. This makes carving smooth and quick.
Step One: Remove the Turkey Legs
Start with the legs. They’re the easiest part to carve turkey.
Pull one leg away from the body. You’ll see where it connects. Cut through the skin between the leg and breast.
Keep pulling the leg outward. The joint will pop out. Slice through the joint to remove the whole leg.
Repeat on the other side. Now you have both legs removed.
Separate Thighs from Drumsticks
Place one leg skin-side down on your board. You’ll see a line of fat between the thigh and drumstick. This marks the joint.
Cut through this line. The pieces will separate easily. Do the same with the second leg.
Now you have four pieces: two drumsticks and two thighs. Put them on your serving platter.
The thigh meat can be sliced off the bone if you prefer. Just run your knife along the bone and lift the meat away.
Step Two: Tackle the Turkey Wishbone
Many people skip this step. But removing the wishbone first makes everything easier.
Feel around the neck cavity. The wishbone sits right there in a V shape. Run your finger along it to find the outline.
Use a small knife to cut the meat away from the bone. Work slowly and follow the bone’s shape. Pull the wishbone out once it’s free.
Save the wishbone for a fun tradition. Two people pull it apart and make wishes.
Without the wishbone in the way, carving the breast becomes much simpler.
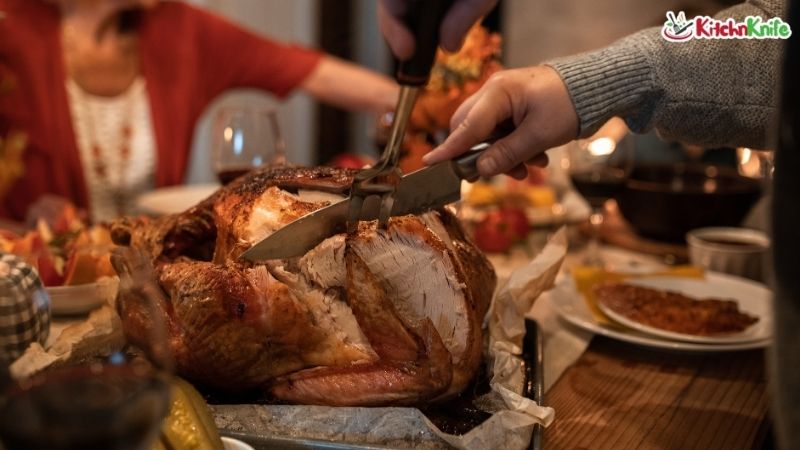
Step Three: Carve the Breast Meat
This is where most people struggle. Follow these steps to carve turkey breast perfectly.
Find the breastbone running down the center. Make a long cut along one side of this bone. Cut all the way down to the ribs.
Use smooth, long strokes. Short choppy cuts tear the meat.
Once you’ve cut down to the bone, angle your knife. Slice the breast meat away from the rib cage. The whole breast half will come off in one piece.
Place this breast half on your cutting board. Slice it crosswise into pieces about half an inch thick.
Repeat on the other side of the turkey. Now you have beautiful, even slices.
Tips for Perfect Slices
- Cut against the grain for tender bites
- Keep your knife at a slight angle
- Make slices the same thickness
- Work slowly and carefully
If your turkey recipe included a spatchcock turkey method, the breast will already be flatter. This makes slicing even easier.
Step Four: Remove the Wings
The wings are small but tasty. They make great snacks.
Pull one wing away from the body. Find where it connects at the joint. Cut through this joint with your knife.
The wing will come right off. Do the same with the other wing.
Some people like to separate the wing into two parts. Cut at the joint between the drumette and the flat.
Add the wings to your platter. They’re perfect for people who love crispy skin.
Dealing with Different Cooking Methods
Your carving approach might change based on how you cooked your bird.
Roast Turkey Parts: If you cooked turkey parts separately, carving is simpler. Each piece is already separated. Just slice the breast and thighs.
Spatchcock Turkey: This method removes the backbone before cooking. The bird lies flat. Carving is similar but easier since everything is more accessible.
No matter which turkey recipe you used, the basic carving steps stay the same. You just might skip some separation steps.
Make Your Carved Turkey Look Amazing
Presentation matters. Here’s how to arrange your carved turkey meat:
Start with the dark meat. Place turkey legs (drumsticks and thighs) on one side of the platter.
Fan out the breast slices in the center. Overlap them slightly for a nice look.
Add the wings at the edges. Tuck any small pieces into gaps.
Pour some pan drippings from your roasting pan over the meat. This adds shine and flavor.
Garnish with fresh herbs like rosemary or thyme. Add orange slices or cranberries for color.
Your carved turkey now looks as good as it tastes.
Keep Your Turkey Meat Juicy
Carved turkey dries out quickly. Follow these tips to keep it moist:
- Don’t carve until ready to serve
- Cover carved pieces with foil if waiting
- Warm your serving platter first
- Keep extra drippings nearby for drizzling
- Slice only what you need right away
If you must carve early, store pieces in a covered dish. Add some turkey stock or drippings to the bottom. This creates steam and prevents drying.
Fixing Common Carving Problems
Even experienced cooks face issues. Here are quick fixes:
Meat looks shredded: Your knife is too dull. Switch to a sharper blade.
Slices fall apart: The turkey didn’t rest long enough. Next time, wait a full 30 minutes.
Can’t find joints: Use your hands to bend the parts. The joint will become obvious when it moves.
Breast meat is dry: This happened during cooking, not carving. Save it by serving with gravy or sauce.
Meat sticks to bones: Cook turkey meat a bit longer next time. Properly cooked meat releases easily.
Don’t worry if your first attempt isn’t perfect. You’ll improve with practice.
What to Do with Leftover Parts
Don’t throw away the carcass. It makes amazing turkey stock.
Break up the bones and put them in a large pot. Add water, onions, carrots, and celery. Simmer for several hours.
Strain the liquid and you have rich, homemade stock. Use it for soup, gravy, or cooking grains.
Pick any remaining meat off the bones. This meat works great in sandwiches, salads, or casseroles.
The roasting pan also holds treasure. Those browned bits make the best gravy. Scrape them up and use them.
Frequently Asked Questions
How long should I let turkey rest before carving?
Rest your turkey for 20 to 30 minutes after it comes out of the oven. This lets juices redistribute through the meat. Cover loosely with foil to keep it warm.
Do I need special tools to carve turkey?
You only need a sharp carving knife and a cutting board. A carving fork helps but isn’t required. Avoid electric knives as they can shred the meat.
Should I remove the wishbone before or after cooking?
Remove the wishbone before cooking if you remember. This makes carving much easier. But you can also remove it after cooking when the meat is looser.
Can I carve turkey cold the next day?
Yes, cold turkey is actually easier to carve. The meat is firmer and holds together better. This works great for making sandwiches with clean slices.
What’s the best way to carve a spatchcock turkey?
With spatchcock turkey, flip it breast-side up after resting. Remove the legs first, then carve the breast halves. The flat shape makes everything more accessible.
Your Path to Perfect Turkey Carving
Now you know how to carve turkey like a professional. You understand the anatomy, have the right tools, and know each step.
Start with confidence at your next holiday meal. Remove those turkey legs first. Take out the wishbone. Carve beautiful breast slices. Arrange everything on a pretty platter.
Your guests will be impressed. More importantly, everyone gets tender, juicy meat.
The key is practice. Each time you carve turkey, you’ll get faster and better. Soon it will feel natural and easy.
Remember to let your bird rest, keep your knife sharp, and work slowly. These three rules make all the difference.
You’ve got this. Happy carving!