Last Updated on June 26, 2026 by Susanna Zuyeva
Why Cleaning Blender Blades Matters
Dirty blender blades are a real health risk.
Food stuck near the blade base grows bacteria fast. Smoothie residue, nut butter, and soup all hide under the blades where water alone cannot reach.
A clean blade also performs better. Dull, gunked-up blades do not cut as smoothly. Regular cleaning keeps the blade sharp and the motor running well.
The good news? You do not need special tools. Just a few common items and the right steps.
What You Need Before You Start
Gather these items first:
For basic cleaning:
- Warm water
- Dish soap
- Long-handled bottle brush
- Microfiber cloth or paper towels
For deep cleaning:
- White vinegar or baking soda
- A soft sponge
- Rubber or cut-resistant gloves
Always wear gloves when touching the blades directly. The edges are extremely sharp even when the blender is off and unplugged.
The Self-Clean Method (Fastest Way)
This works great for everyday smoothies and light use.
Step 1: Rinse the blender jar right after use. Do not let food sit.
Step 2: Fill the jar halfway with warm water. Add two drops of dish soap.
Step 3: Place the lid firmly on top.
Step 4: Run the blender on low for 30 seconds, then switch to high for another 30 seconds.
Step 5: Pour out the soapy water. Rinse with clean water twice.
Step 6: Let it air dry upside down on a drying rack.
This method cleans most of the blade area without any contact. It is safe, quick, and very effective for daily use.
How to Deep Clean Blender Blades by Hand
Do this once a week or after blending thick mixtures like hummus, nut butter, or frozen fruit.
Step 1: Unplug the blender first. This is the most important step. Never clean near the motor base while it is plugged in.
Step 2: Remove the jar from the base. Twist it off carefully and set the base aside.
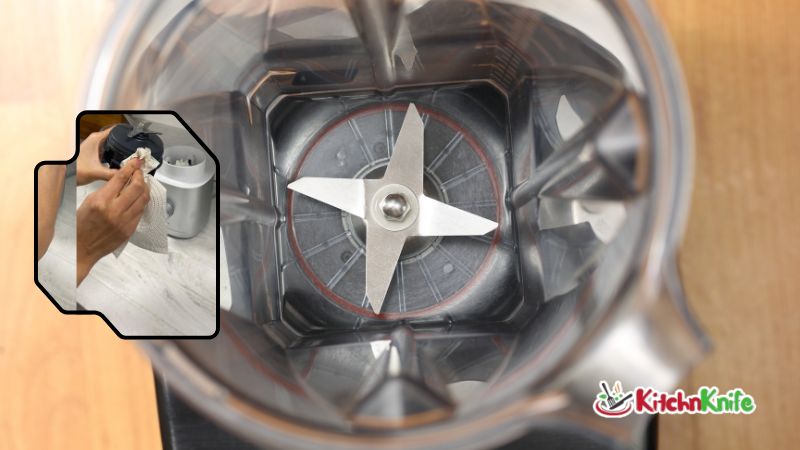
Step 3: Unscrew the blade assembly (if removable). Hold the jar upside down. Use a rubber grip or cloth to twist the bottom seal counterclockwise. Some blenders like Vitamix have non-removable blades. Check your manual first.
Step 4: Put on gloves. Before touching the blade, always wear cut-resistant gloves. Blender blades are four-sided and razor sharp.
Step 5: Wash with a brush, not your hand. Use a long-handled bottle brush. Apply dish soap and scrub around the blade in short, downward strokes. Never swipe your fingers across the blade edge.
Step 6: Clean the gasket and seal. The rubber gasket around the blade base traps food and mold. Scrub it gently with a small brush or old toothbrush.
Step 7: Rinse thoroughly. Hold the blade under running warm water. Make sure no soap is left near the gasket.
How to Remove Stubborn Stains and Odors
Some ingredients stain or smell even after washing. Here is how to fix that.
For turmeric or berry stains: Fill the jar with warm water and add 2 tablespoons of white vinegar. Let it soak for 10 minutes, then run the self-clean cycle. The stain should lift naturally.
For strong odors (garlic, fish, onion): Add 1 tablespoon of baking soda to warm water in the jar. Run the blender for 60 seconds. The baking soda neutralizes odors without harsh chemicals.
For dried or stuck-on food: Soak the blade assembly in warm soapy water for 15 minutes before scrubbing. Never use steel wool or abrasive pads. These scratch the blade coating and dull the edge over time.
How to Dry and Reassemble Safely
Moisture left near the blade base causes rust and mold.
After rinsing, shake off excess water. Place the blade assembly on a clean towel, blade side up. Let it air dry completely before screwing it back on.
To reassemble, hold the jar firmly and screw the blade assembly clockwise until snug. Do not overtighten. Then lock the jar back onto the motor base.
Run a quick rinse cycle with plain water before the next use. This clears any dust that settled while drying.
Common Mistakes to Avoid
Avoid these errors to stay safe and protect your blender:
Reaching in with bare hands. Even a stationary blade causes deep cuts. Always use a brush or gloves.
Putting blades in the dishwasher too often. Dishwasher heat weakens the rubber gasket over time. Hand wash weekly and use the dishwasher only occasionally.
Leaving blades to soak too long. Soaking more than 30 minutes can loosen the blade seal and cause leaks.
Cleaning while still plugged in. Always unplug first. No exceptions.
Using hot water on plastic jars. Very hot water can warp BPA-free plastic and cloud the jar. Use warm water only.
Tips to Keep Blades Clean Longer
Small habits make a big difference.
Rinse the blender immediately after each use. The longer food sits, the harder it is to remove.
Blend a cup of plain water after every thick blend. This flushes food away from the blade base before it dries.
Once a month, blend a mixture of ice and water for 30 seconds. This naturally polishes the blade edge and removes mineral buildup.
Store the jar with the lid off so air circulates and moisture evaporates.
Final Thoughts
Cleaning blender blades safely is simple when you follow the right steps. Unplug first, use a brush instead of your hands, wear gloves when disassembling, and dry fully before storage.
A clean blender is a safe blender. It tastes better, lasts longer, and protects your family from hidden bacteria.
Make it a daily habit and your blender will work like new for years.