Last Updated on November 2, 2025 by Kathay Lee
Why Choose a Magnetic Knife Strip for Your Kitchen?
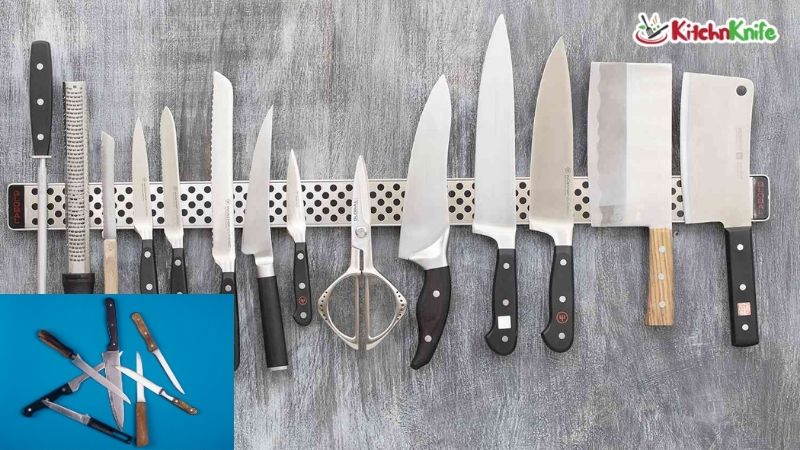
A magnetic knife strip changes how you store your kitchen knives. This simple tool keeps your blades safe, sharp, and easy to reach. Unlike bulky knife blocks that take up counter space, a wall mounted strip frees up room for food prep.
The magnetic strip offers clear benefits. You can see all your knives at once. Your chef knife stays sharp because the blade doesn’t rub against anything. The strip holds your entire knife set without taking up any counter space.
Many home cooks switch from knife blocks to magnetic strips. The change makes cooking easier and faster. You grab the knife you need in seconds.
What You Need to Get Started
Before you begin, gather your supplies. The right tools make installation smooth and quick.
Your magnetic knife strip comes in different styles. Stainless steel strips look modern and clean. Wood-covered strips add warmth to your kitchen. Both work the same way.
Tools for drilling method:
- Drill with appropriate bits
- Screws (usually included with your strip)
- Level tool
- Pencil for marking
- Stud finder
- Measuring tape
Tools for installation without drilling:
- Strong adhesive strips or mounting tape
- Rubbing alcohol
- Clean cloth
- Level tool
The method you choose depends on your wall type and rental situation. Renters often prefer the no-drill approach.
Finding the Perfect Spot in Your Kitchen
Location matters for both function and safety. The right spot makes cooking easier.
Height is key. Mount your strip between 48 and 54 inches from the floor. This height works for most adults. You can reach your knives easily without stretching.
Stay away from heat and water. Keep the strip at least 18 inches from your stove. Heat can affect the magnets over time. Also avoid spots directly above the sink where water splashes.
Consider your workflow. Place the strip near your main cutting area. The best spot is often on the wall next to your prep counter. You can grab a knife and start chopping right away.
Check for outlets and switches. Make sure your chosen spot doesn’t have electrical boxes behind it. These areas complicate drilling.
Installing Your Magnetic Strip: Three Methods
Method 1: Standard Drilling Installation (Most Secure)
This method works best for long-term installation. It holds the most weight and feels rock solid.
Step 1: Find the wall studs. Run your stud finder along the wall. Mark the stud locations with a pencil. Mounting into studs provides maximum strength.
Step 2: Mark your mounting holes. Hold the strip against the wall at your chosen height. Use a level to make sure it’s straight. Mark where the screw holes will go through the strip.
Step 3: Drill pilot holes. Use a drill bit slightly smaller than your screws. Drill into the marked spots. If you hit a stud, the hole will feel solid.
Step 4: Attach the strip. Line up the strip with your pilot holes. Insert screws through the mounting holes. Tighten each screw firmly but don’t overtighten.
Step 5: Test the installation. Gently pull on the strip. It should not move at all. Now you’re ready to add your knives.
Method 2: Installation Without Drilling (Renter-Friendly)
This DIY magnetic strip installation works great for renters. It leaves no permanent marks on your walls.
Step 1: Clean the surface. Wipe your wall with rubbing alcohol. Let it dry completely. This helps the adhesive stick better.
Step 2: Prepare adhesive strips. Use heavy-duty mounting strips rated for at least 16 pounds. Apply them to the back of your magnetic strip according to package directions.
Step 3: Position and press. Place the strip on the wall at your desired height. Use a level to check alignment. Press firmly for 30 seconds.
Step 4: Wait before use. Let the adhesive cure for at least one hour. Some brands require 24 hours for full strength.
Important note: This method works best for lighter knife sets. A strip holding five to six knives is ideal. Heavy chef knives and large knife blocks require the drilling method.
Method 3: Mounting on Tile Backsplash
Your tile backsplash makes an excellent spot for kitchen knife storage. The process needs extra care to avoid cracking tiles.
Step 1: Choose mounting spots. Try to align screws with grout lines when possible. Drilling through grout is easier than drilling through tile.
Step 2: Use the right bit. Get a carbide-tipped masonry bit. This bit cuts through ceramic or porcelain tile without cracking it.
Step 3: Mark and tape. Mark your drilling spots with a pencil. Place a small piece of painter’s tape over each mark. The tape prevents the drill bit from slipping.
Step 4: Drill slowly. Start at low speed with light pressure. Let the bit do the work. Don’t force it. Once through the tile, you may hit drywall or cement board behind it.
Step 5: Install anchors if needed. If there’s no stud behind your tile, use appropriate wall anchors. Plastic or metal anchors work well in drywall behind tile.
Step 6: Mount your strip. Screw the strip into place. Tighten screws gently on tile to avoid cracking.
Arranging Your Knives Safely
Once mounted, arrange your kitchen knives with care. Proper placement keeps everyone safe.
Place knives blade-up. The spine of the knife should touch the strip. This orientation is safer and looks cleaner. When you grab the handle, your fingers stay away from the blade edge.
Space knives apart. Leave at least one inch between each knife. This spacing prevents blades from touching. Your knives stay sharp longer.
Heaviest knives in the center. Put your chef knife and other heavy blades near the middle of the strip. This balances the weight.
Small knives on the ends. Paring knives and utility knives go toward the sides. They’re lighter and you use them often.
Test each knife. After placing a knife on the strip, give it a gentle tug. It should hold firmly. If a knife slides down, your strip may not be strong enough for that blade.
Creative Installation Locations Beyond Walls
The standard wall location isn’t your only option. Think about these alternative spots.
Inside kitchen cabinet doors work perfectly for small knife sets. This approach hides your knives but keeps them accessible. Mount a shorter strip inside a cabinet door near your prep area.
Under cabinet mounting saves wall space. Attach your knife bar to the underside of upper cabinets. This spot works especially well in tight kitchens. Make sure the strip is far enough back that you don’t hit it with your head.
On the side of cabinets creates an end-of-counter storage spot. This location keeps knives visible and accessible. It works great if you have a cabinet that ends near your main work zone.
Each location has pros and cons. Wall mounted strips are most common because they’re easy to access and work with any kitchen layout.
Keeping Your Strip and Knives in Great Shape
Regular maintenance extends the life of your magnetic knife storage system.
Clean the strip weekly. Wipe it down with a damp cloth. Food particles and grease can build up on the surface. A clean strip looks better and holds knives more securely.
Dry your knives before mounting. Wet knives can cause rust spots on stainless steel strips. Always dry your blades after washing them.
Check mounting screws monthly. Give screws a quick tighten if needed. This is especially important in the first few months after installation.
Polish stainless steel strips. Use a microfiber cloth and stainless steel cleaner once a month. This keeps your strip looking new.
Inspect for wear. Check that the magnetic strength hasn’t decreased. If knives start slipping, it may be time for a replacement.
Fixing Common Problems
Even with careful installation, issues can pop up. Here’s how to solve them.
Problem: Strip won’t hold knives firmly
This usually means your strip isn’t strong enough for your knife set. Commercial-grade strips have stronger magnets. You can also try a wider strip with more magnetic surface area.
Problem: Strip is coming loose from the wall
For drilled installations, tighten the mounting screws. You may need longer screws or wall anchors if you’re not hitting studs. For adhesive installations, remove the strip and start fresh with new mounting tape.
Problem: Knives leave marks on the strip
This is normal wear. Clean marks with a magic eraser or soft scrub cleaner. To prevent marks, make sure knives are dry before mounting them.
Problem: Strip is crooked
If you used the drilling method, you may need to remove it and start over. Take more time with your level during the next installation. For adhesive strips, carefully peel them off while the adhesive is still removable and reposition.
Frequently Asked Questions
How much weight can a magnetic knife strip hold?
Most strips hold between 10 to 20 pounds when properly installed. This is enough for a typical home knife set of 6 to 8 knives. Check your specific product specifications. Commercial-grade strips hold more weight.
Will the magnets damage my knife blades?
No. The magnetic field is not strong enough to affect the metal in your knives. Your blades will stay sharp. In fact, magnetic strips are better for blade edges than knife blocks because there’s no friction.
Can I mount a magnetic strip on drywall without hitting studs?
Yes, but use heavy-duty wall anchors. Plastic or metal toggle anchors work well. Make sure anchors are rated for more weight than your knives. This provides a safety margin.
Do magnetic strips work with all types of knives?
They work with any knife that has a steel blade. Stainless steel, carbon steel, and Damascus steel all stick to the magnets. Ceramic knives won’t work because ceramic isn’t magnetic.
How long does adhesive mounting last?
High-quality mounting tape can last several years. The lifespan depends on wall texture, humidity, and weight load. Adhesive works best on smooth, painted walls. Textured walls don’t provide enough contact for strong adhesion.
Can I install a magnetic strip in a rental kitchen?
Yes. Choose the installation without drilling method. Use removable mounting strips designed for damage-free removal. Always check your lease agreement first.
What’s better: a knife block or magnetic strip?
Magnetic strips win for most kitchens. They save counter space, keep knives visible, and protect blade edges better. Knife blocks work if you want to hide knives or prefer traditional storage. Both options are valid.
How do I remove a magnetic strip installed with adhesive?
Pull the strip away from the wall slowly. Use dental floss or fishing line to cut through the adhesive if it’s very strong. Clean remaining adhesive with rubbing alcohol or adhesive remover.
Final Thoughts on Your New Knife Storage
A magnetic knife strip transforms kitchen knife storage. The installation takes less than 30 minutes. You get organized, accessible storage that makes cooking more enjoyable.
Choose the installation method that fits your situation. Homeowners can use the drilling method for maximum strength. Renters can mount strips without drilling and still get great results.
Your kitchen will look cleaner with knives off the counter. You’ll cook more efficiently when your tools are easy to reach. The wall mounted strip keeps your knife set organized and your blades sharp.
Start with the right location and tools. Follow the steps carefully. Soon you’ll wonder why you ever used a knife block.
Your kitchen knives deserve better storage. A magnetic knife bar gives them exactly that.